HDMI/Micro-HDMI vs DSI – Conectores de pantalla Raspberry Pi 4
2025-10-02
11:50
Introducción
Al saltar al mundo de Raspberry PiConocer los conectores de pantalla es súper clave para hacer que los proyectos brillen. Ya sea construir una interfaz de usuario elegante o simplemente necesitar una pantalla para mostrar cosas, elegir entre HDMI (o Micro-HDMI) y Conectores DSI puede cambiar lo bien que funcionan las cosas, cómo coinciden y lo que cuestan.
¿Qué es un Raspberry Pi?
El Raspberry Pi es un ordenador pequeño y barato, del tamaño de una tarjeta de crédito. Se conecta a un monitor o TV. También funciona con un teclado y un ratón normales. Este gadget genial permite a personas de todas las edades jugar con la computación y aprender a programar en lenguajes como Scratch y Python. Puede hacer muchas de las cosas que hace una computadora normal, como navegar por la web, reproducir vídeos claros, hacer hojas de cálculo, escribir documentos e incluso ejecutar juegos. El Raspberry Pi 4 es el último de la familia Raspberry Pi. Es el más cremallera en comparación con los modelos más antiguos.
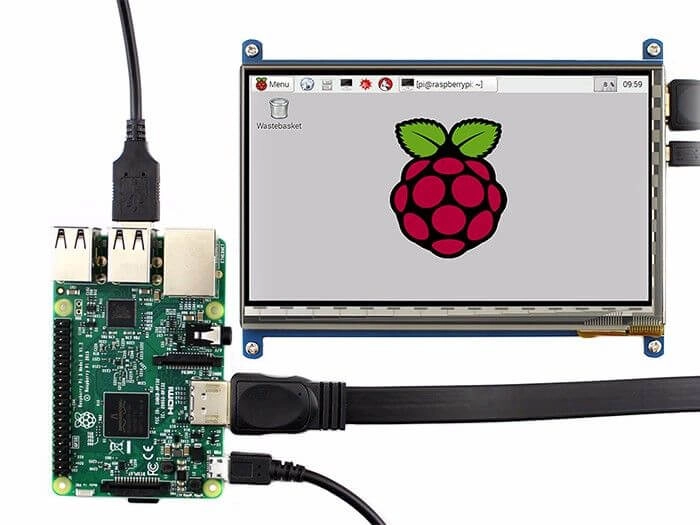
Conectar una pantalla a una Raspberry Pi
Usar una Raspberry Pi para proyectos significa que conectar una pantalla ayuda a interactuar mejor con ella. Pero hay diferentes conectores para conectarse a una pantalla. Puede ser un poco complicado elegir el correcto para una pantalla.
Conectores de pantalla en el Raspberry Pi
El Raspberry Pi 4 tiene tres conectores de pantalla en total. Estos son dos conectores Micro-HDMI y un conector DSI.
El Raspberry Pi 3, por otro lado, tiene un conector HDMI estándar y un conector DSI. La única gran diferencia entre Micro-HDMI y HDMI regular es su tamaño.
Este blog utiliza HDMI de manera general, ya que las versiones regular y Micro solo difieren en tamaño.
¿Qué es HDMI?
HDMI significa interfaz multimedia de alta definición. Es un conector y cable que envían sonido y imágenes de primera clase entre dispositivos. Además, los datos enviados a través de HDMI son crudos y digitales. Esto permite que HDMI lleve señales de vídeo tan nítidas como la resolución 4K.
HDMI es muy común en televisores, monitores, proyectores, sistemas de juegos y computadoras. Eso lo convierte en una de las interfaces más convenientes. Su fácil configuración plug-and-play significa que no se necesita software adicional para iniciar.
Diferentes versiones HDMI
Hay muchas versiones HDMI, pero este artículo se centra en las de Raspberry Pi 3 y Raspberry Pi 4. El Raspberry Pi 3 utiliza HDMI versión 1.3. El Raspberry Pi 4 utiliza HDMI versión 2.0.
Aquí está el breakdown:
Conexión HDMI 1.3: Manijas hasta 1080p@60Hz con un ancho de banda de 10,2 Gbit/s.
Conexión HDMI 1.4Soporta hasta 4K@30Hz Pero no soporta HDR.
Conexión HDMI 2.0Se encuentra en Raspberry Pi 4, soporta hasta 4K@60Hz Incluye características HDR.
| Versión HDMI | Ancho de banda de transmisión | Resolución | HDR | HDCP |
| Conexión HDMI 2.0 | 18.0 Gbit/s | 4K@60Hz | Soporte | 2.2 |
| Conexión HDMI 1.4 | 10,2 Gbit/s | 4K@30Hz | No. | 1.4 |
| Conexión HDMI 1.3 | 10,2 Gbit/s | 1080p@60Hz | No. | 1.2 |
¿Qué es DSI?
DSI es la abreviatura de Display Serial Interface. Hace una conexión en serie rápida entre un procesador principal y una unidad de pantalla. La gente a menudo lo llama MIPI DSI porque MIPI es el estándar detrás de él. A diferencia de HDMI, las pantallas DSI están hechas para dispositivos específicos. Se encuentran en cosas como teléfonos móviles, computadoras portátiles, relojes inteligentes y otros dispositivos.
Cada placa Raspberry Pi tiene un conector DSI de 15 pines incorporado. Se necesita un cable de cinta de 15 pines para conectar el Raspberry Pi a una pantalla DSI.
Ventajas del uso de DSI para la comunicación
DSI ofrece un montón de ventajas geniales para proyectos pequeños e integrados:
Conexión en serie rápidaMueve los datos rápidamente.
Utiliza menos energíaAhorra energía, lo que es ideal para configuraciones pequeñas.
Bajo ruido eléctrico (EMI)Mantiene las señales limpias.
Necesita menos pines para vincularSimplifica las conexiones.
Soporta el envío de contenido 3D: Manipula imágenes de lujo.
Opción amigable con el presupuestoCosta menos que otras opciones.
Estas características hacen de DSI una excelente opción para sistemas pequeños donde el ahorro de energía es importante.

HDMI vs DSI
Aquí hay un vistazo lado a lado a las dos interfaces:
| Características | DSi | Conexión HDMI |
| Compatibilidad LCD | Sólo unos pocos LCD funcionan | Soporta muchos LCD |
| Soporte de audio | Sin soporte de sonido | Tiene soporte de sonido |
| Consumo de energía | Utiliza poca energía | Utiliza más energía |
| Facilidad de conexión | Fácil de fijar cable FPC de 15 pines | Conector HDMI fácil de conectar |
| Pantalla de alimentación | Puede alimentar la pantalla a través de DSI | No se puede alimentar la pantalla a través de HDMI |
| Costo | Opción más barata | Más caro |
Dependiendo de las necesidades del proyecto, como salida de vídeo y sonido o sistemas pequeños de baja potencia, uno podría ser mejor que el otro.
Preguntas frecuentes
¿Puedo usar cualquier pantalla táctil con mi Raspberry Pi a través de DSI?
No. Las pantallas DSI generalmente se hacen para configuraciones específicas. Compruebe si coinciden antes de comprar.
¿Por qué mi Micro-HDMI no encaja en modelos más antiguos?
Los modelos más antiguos como el Raspberry Pi 3 tienen puertos HDMI de tamaño completo. Los más nuevos como el Raspberry Pi 4 usan puertos Micro-HDMI para ahorrar espacio.
¿El uso de DSI libera puertos USB?
Sí, sí. A diferencia de algunas pantallas que se conectan a través de USB, DSI utiliza sus propios pines en la placa. No toma ranuras USB.
¿Existe una diferencia de velocidad entre estas interfaces?
DSI a menudo tiene menos retraso ya que se conecta directamente. HDMI puede necesitar convertidores externos, que pueden ralentizar las cosas un poco.
Ordenar pantallas Raspberry Pi de Kadi Display
Para los creadores que quieren soluciones especiales más allá de las pantallas básicas, Kadi Display ofrece muchas opciones personalizadas. Estos incluyen la claridad de la pantalla, ajustes de brillo, opciones táctiles (CTP / RTP), diseño de la carcasa, tipos de conexión (TTL / LVDS / MIPI / EDP / DP / HDMI / Tipo-C / VGA / USB-A), unión óptica, recubrimientos antirreflejos y más. Todos están construidos resistentes para uso industrial.
Hacen el vidrio de cubierta como se solicita: LOGO, color, forma, grosor. Por favor. Contacte con nosotros para enviar su consulta ahora.
PREVIOR
6 conceptos comunes en soluciones de iluminación de fondo - CCFL, WLED, DLED, ELED, Mini LED, PWM
Siguiente
Cómo se usan los monitores de pantalla táctil de marco abierto para la automatización industrial de HMI
Deja un comentario

Últimos blogs y noticias
- IPS vs Other Panels How to Select Display Interfaces for Embedded and Industrial TFT LCD
- 7-Inch MIPI DSI Displays: Top Specifications and Best Choices in 2026
- Wide Temperature TFT Displays for Industrial Applications
- Display Coatings How AG, AF, and AR Solutions Solve Critical Display Problems
- Una guía paso a paso para dominar MIPI DSI