HDMI/Micro-HDMI vs DSI – Connettori di schermo Raspberry Pi 4
2025-10-02
11:50
Introduzione
Quando salti nel mondo di Raspberry Piconoscere i connettori di visualizzazione è super chiave per far brillare i progetti. Che sia la costruzione di un'interfaccia utente elegante o solo bisogno di uno schermo per mostrare le cose, scegliere tra HDMI (o Micro-HDMI) e Connettori DSI può cambiare il modo in cui funzionano le cose, come corrispondono e quanto costano.
Che cos'è un Raspberry Pi?
Il Raspberry Pi è un computer economico e piccolo, circa le dimensioni di una carta di credito. Si collega a un monitor o TV e funziona anche con una tastiera e un mouse normali. Questo fantastico gadget consente a persone di tutte le età di giocare con il computer e imparare la codifica in linguaggi come Scratch e Python. Può fare molte cose che un normale computer fa, come navigare sul web, riprodurre video chiari, creare fogli di calcolo, scrivere documenti e persino eseguire giochi. Raspberry Pi 4 è l’ultimo della famiglia Raspberry Pi. È il più zippiest rispetto ai modelli più vecchi.
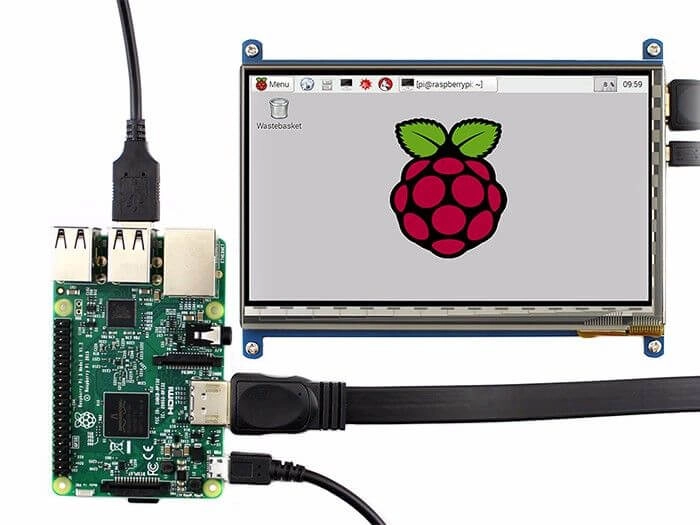
Collegare un display a un Raspberry Pi
Utilizzare un Raspberry Pi per progetti significa collegare un display aiuta ad interagire meglio con esso. Ma ci sono diversi connettori per collegarsi a uno schermo. Può sembrare un po 'difficile scegliere quello giusto per un display.
Display Connectors sul Raspberry Pi
Il Raspberry Pi 4 ha tre connettori di display in totale. Si tratta di due connettori Micro-HDMI e un connettore DSI.
Il Raspberry Pi 3, invece, ha un connettore HDMI standard e un connettore DSI. L'unica grande differenza tra Micro-HDMI e HDMI normale è la loro dimensione.
Questo blog utilizza HDMI in modo generale, poiché le versioni regolare e Micro differiscono solo per dimensioni.
Che cos'è HDMI?
HDMI è l’acronimo di High Definition Multimedia Interface. È un connettore e un cavo che inviano suoni e immagini di alto livello tra dispositivi. Inoltre, i dati inviati tramite HDMI sono grezzi e digitali. Questo consente all'HDMI di trasportare segnali video nitidi come la risoluzione 4K.
HDMI è molto comune in TV, monitor, proiettori, sistemi di gioco e computer. Questo lo rende una delle interfacce più convenienti là fuori. La sua facile configurazione plug-and-play significa che non è necessario alcun software aggiuntivo per avviare.
Differenti versioni HDMI
Ci sono molte versioni HDMI, ma questo articolo si concentra su quelle di Raspberry Pi 3 e Raspberry Pi 4. Il Raspberry Pi 3 utilizza la versione HDMI 1.3. Il Raspberry Pi 4 utilizza la versione HDMI 2.0.
Ecco il breakdown:
HDMI 1.3: Maniglie fino a 1080p@60Hz con una larghezza di banda di 10,2 Gbit/s.
HDMI 1.4Supporta fino a 4K@30Hz Ma non gestisce HDR.
Servizio HDMI 2.0Trovato su Raspberry Pi 4, supporta fino a 4K@60Hz Include funzionalità HDR.
| Versione HDMI | Larghezza di banda di trasmissione | Risoluzione | HDR | HDCP |
| Servizio HDMI 2.0 | 18,0 Gbit/s | 4K@60Hz | Supporto | 2.2 |
| HDMI 1.4 | 10,2 Gbit/s | 4K@30Hz | No. No. | 1.4 |
| HDMI 1.3 | 10,2 Gbit/s | 1080p@60Hz | No. No. | 1.2 |
Cosa è DSI?
DSI è l'acronimo di Display Serial Interface. Realizza una connessione seriale veloce tra un processore principale e un'unità di visualizzazione. La gente spesso lo chiama MIPI DSI perché MIPI è lo standard dietro di esso. A differenza di HDMI, i display DSI sono fatti per specifici gadget. Si trovano in cose come telefoni cellulari, laptop, smartwatch e altri dispositivi.
Ogni scheda Raspberry Pi ha un connettore DSI a 15 pin integrato. È necessario un cavo a nastro a 15 pin per collegare il Raspberry Pi a un display DSI.
Vantaggi dell'utilizzo di DSI per la comunicazione
DSI offre un sacco di vantaggi interessanti per piccoli progetti integrati:
Connessione seriale rapidaSposta rapidamente i dati.
Utilizza meno potenzaRisparmia energia, ideale per piccole installazioni.
Basso rumore elettrico (EMI)Mantiene i segnali puliti.
Necessità di meno pin per il collegamentoSemplifica le connessioni.
Supporta l'invio di contenuti 3D: Gestisce immagini fantastiche.
Opzione budget-friendlyCosta meno rispetto ad altre opzioni.
Queste caratteristiche rendono DSI una scelta eccellente per sistemi minuscoli dove il risparmio di energia è importante.

HDMI contro DSI
Ecco uno sguardo fianco a fianco alle due interfacce:
| Caratteristiche | DSI | connessione HDMI |
| Compatibilità LCD | Solo pochi LCD funzionano | Supporta molti LCD |
| Supporto audio | Nessun supporto sonoro | Ha supporto sonoro |
| Consumo di energia | Utilizza poca potenza | Utilizza più potenza |
| Facilità di connessione | Facile da collegare cavo FPC a 15 pin | Connettore HDMI semplice da collegare |
| Display di alimentazione | Può alimentare il display attraverso DSI | Non è possibile alimentare il display tramite HDMI |
| Costo | Opzione più economica | Più costoso |
A seconda delle esigenze del progetto, come l'uscita video e audio o i piccoli sistemi a bassa potenza, uno potrebbe essere migliore dell'altro.
Domande frequenti
Posso usare qualsiasi touchscreen con il mio Raspberry Pi tramite DSI?
No. I display DSI sono di solito realizzati per impostazioni specifiche. Quindi, controlla se corrispondono prima di acquistare.
Perché il mio Micro-HDMI non si adatta ai modelli più vecchi?
I modelli più vecchi come il Raspberry Pi 3 hanno porte HDMI full-size. I più recenti come il Raspberry Pi 4 utilizzano porte Micro-HDMI per risparmiare spazio.
L'uso di DSI libera le porte USB?
Si', lo fa. A differenza di alcuni display che si collegano tramite USB, DSI utilizza i propri pin sulla scheda. Non prende slot USB.
C'è una differenza di velocità tra queste interfacce?
DSI spesso ha meno ritardo poiché si connette direttamente. HDMI potrebbe richiedere convertitori esterni, che possono rallentare le cose un po '.
Ordinare Raspberry Pi Display da Kadi Display
Per i creatori che desiderano soluzioni speciali oltre i display di base, Display Kadi offre un sacco di scelte personalizzate. Questi includono chiarezza dello schermo, modifiche della luminosità, opzioni touch (CTP/RTP), design della cassa, tipi di connessione (TTL/LVDS/MIPI/EDP/DP/HDMI/Type-C/VGA/USB-A), legame ottico, rivestimenti anti-abbagliamento e altro ancora. Tutti sono costruiti resistenti per uso industriale.
Essi fanno il vetro copertura come richiesto - LOGO, colore, forma, spessore. Per favore Contattaci per inviare la tua richiesta ora.
PREVIDENTE
6 concetti comuni nelle soluzioni di retroilluminazione - CCFL, WLED, DLED, ELED, Mini LED, PWM
Prossimo
Come vengono utilizzati i monitor touch a telaio aperto per l'automazione industriale HMI
Lascia un commento

Ultimi Blog & Notizie
- IPS vs Other Panels How to Select Display Interfaces for Embedded and Industrial TFT LCD
- 7-Inch MIPI DSI Displays: Top Specifications and Best Choices in 2026
- Wide Temperature TFT Displays for Industrial Applications
- Display Coatings How AG, AF, and AR Solutions Solve Critical Display Problems
- Una guida passo-passo per padroneggiare MIPI DSI
Blog & Notizie correlate
-
 TN contro IPS2024-7-9
 -
TN contro IPS2024-7-9