Как создать 10″ Сенсорный ЖК-экран для Raspberry Pi
2025-09-26
00:00
Понимание аппаратных требований
Обзор совместимых моделей Raspberry Pi
Чтобы получить 10″ сенсорный экран LCD Работа с A Малина ПиВам нужно выбрать правильную доску. Многие новые версии Raspberry Pi, такие как Raspberry Pi 3B, 3B, 4B и даже Zero W, хорошо работают, потому что у них есть выход HDMI и порты USB для дисплея и сенсорных функций. Эти платы отлично подходят для подключения внешних экранов благодаря их шпилькам GPIO и обычным слотам подключения.
Особенности 10″ сенсорный экран LCD
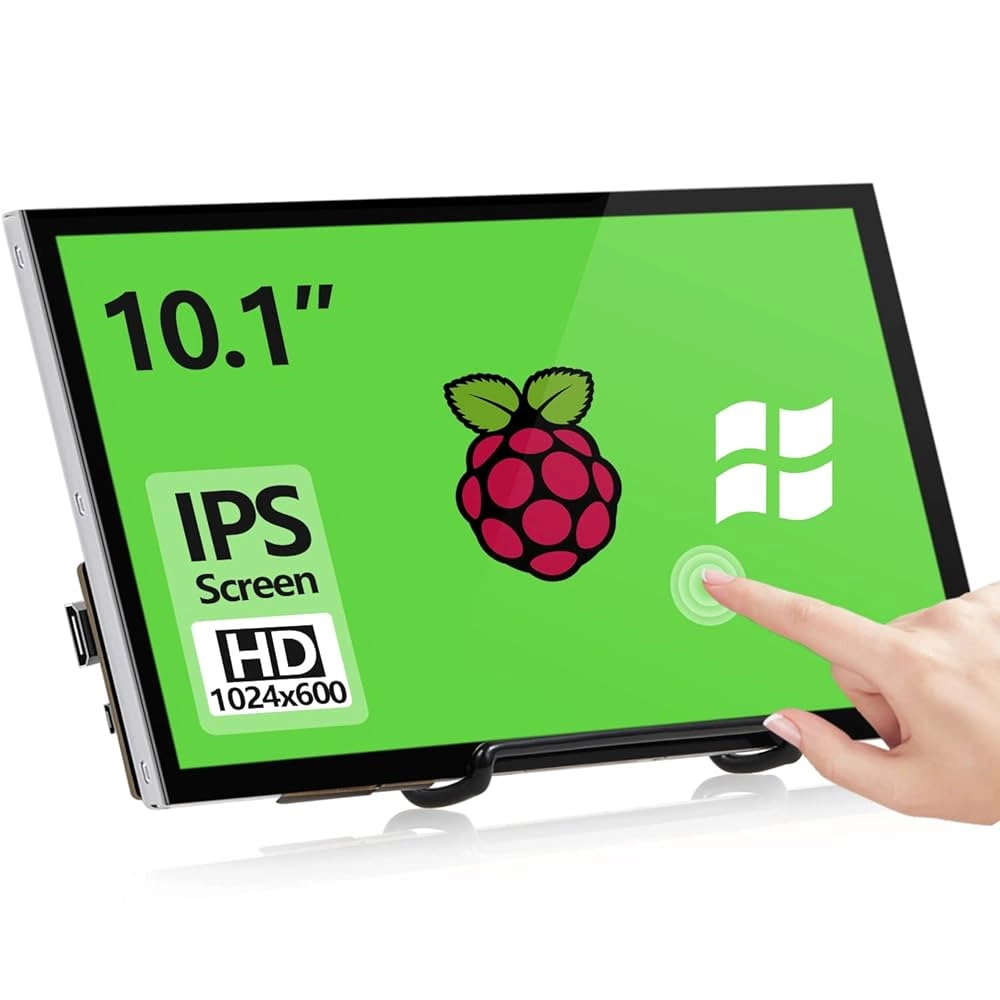
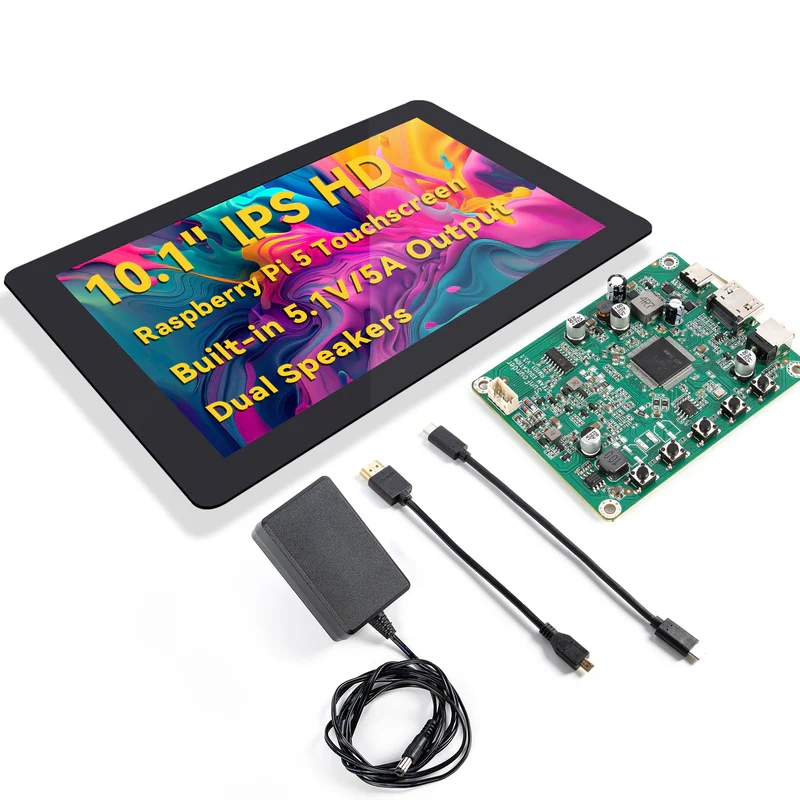
Хороший 10,1-дюймовый сенсорный экран обычно имеет четкое изображение с разрешением между 1280×800 и 1920×1200 пикселей. Он часто использует технологию IPS для ярких цветов и широких углов зрения. ЖК-дисплей IPS TFT предлагает угол просмотра до 178 градусов, поэтому изображение остается острым и красочным практически из любого места. Отличное качество цвета и прочная конструкция, которая может справиться с некоторыми ударами и давлением, делают эти экраны идеальными для практических проектов. Многие также поддерживают мультитачч, поднимая до десяти пальцев одновременно.
Необходимые кабели и аксессуары
Чтобы связать свой ЖК с Raspberry Pi, вам понадобится несколько вещей:
-
Кабель HDMI для видеопередачи.
-
USB-кабель или GPIO для сенсорных сигналов.
-
Адаптер питания, часто около 12 В / 1,5 А.
-
кронштейны или корпус для монтажа.
Эта плата контроллера также поставляется с адаптером питания, выдвигающим 12 В при 1500 МА, который также может питание Pi. Это сокращает беспорядочные проводы, поскольку оба гаджета могут использовать один и тот же источник питания.
Подготовка Raspberry Pi к интеграции LCD
Установка операционной системы на Raspberry Pi
Во-первых, поставьте Raspberry Pi OS на карту microSD с помощью такого инструмента, как Raspberry Pi Imager или Balena Etcher. Вставьте карту в свой Pi. Затем запустите его с подключенной клавиатурой и мышей.
Обновление прошивки и пакетов программного обеспечения
После запуска ОС Raspberry Pi откройте терминал и введите:
sudo apt обновление & & sudo apt полное обновление -ysudo rpi-обновление
Это гарантирует, что ваша система имеет новейшие обновления и драйверы для подключения таких вещей, как экраны.
Настройка дисплея в Raspberry Pi OS
Если ваш экран не выглядит правильно сам по себе, настройте файл /boot/config.txt. Просто введите:
sudo nano / загрузка / конфигурация.txt
При необходимости добавьте или измените следующие строки:
hdmi_group=2hdmi_mode=87hdmi_cvt=1280 800 60 6 0 0
Сохраните его и перезагрузите Pi.
Подключение 10″ Сенсорный LCD для Raspberry Pi
Подключения HDMI и питания
Подключите одну сторону кабеля HDMI в слот HDMI вашего Raspberry Pi. Подключите другую сторону к контроллеру, который был поставлен с экраном. После этого подключите источник питания. Это не Raspberry Pi, это включенная контроллерная плата, которая работает с вашим крошечным компьютером.
Использование GPIO или USB для сенсорного входа
Большинство сенсорных экранов передают сенсорную информацию через USB. Прикрепите USB-кабель с контроллера экрана к USB-слоту на Raspberry Pi. Некоторые экраны могут использовать GPIO для ввода. Но USB проще, так как в основном это plug-and-play.
Соображения по монтажу и физической установке
Экран часто имеет установочные отверстия или кронштейны, удобные для VESA. У него есть монтажные отверстия на спине для любого Raspberry Pi или LattePanda или Beagle Bone. Вы можете закрепить его на стене, стойке или встроить его в индивидуальный корпус с помощью деталей из конструкций CAD или готовых вариантов.
Настройка функциональности сенсорного экрана
Включение сенсорной поддержки в ОС
Сенсорный вход через USB обычно сразу же работает в более новых версиях ОС Raspberry Pi. Чтобы проверить, поднят ли он, введите:
lsusb | grep - я касаюсь
Если вы видите его в списке, вам не нужны дополнительные водители.
Калибровка сенсорного экрана для точности
Чтобы сделать прикосновение более точным, установьте xinput-calibrator. Тип:
sudo apt установить xinput-calibratorxinput_calibrator
Следуйте шагам на экране, чтобы точки контакта были правильно выстроены.
Устранение общих проблем с сенсорным вводом
Если прикосновение не работает, попробуйте следующие шаги:
-
Убедитесь, что кабель USB плотно подключен.
-
Посмотрите на журналы dmesg, чтобы увидеть, появляется ли устройство.
-
Переключитесь на другой USB слот.
-
Обновьте все, введя sudo apt update & & sudo apt обновление.
Оптимизация производительности и удобства использования дисплея
Регулирование разрешения и ориентации экрана
Перейдите в raspi-config в разделе Параметры отображения > Резолюция для установления правильного решения. Для портретного просмотра редактируйте /boot/config.txt следующим образом:
display_rotate=1 # (90°)display_rotate=2 # (180°)display_rotate=3 # (270°)
Управление потреблением энергии с помощью больших дисплеев
Большие экраны нуждаются в большей мощности. Убедитесь, что источник питания достаточно сильный, по крайней мере 12 В / 1,5 А. Вы также можете снизить яркость фонового освещения с помощью программного обеспечения, если это позволяет ваша плата контроллера.
Настройка пользовательского интерфейса для сенсорной навигации
Установите экранную клавиатуру, такую как Matchbox. Просто введите:
sudo apt установить matchbox-клавиатуру
Как только вы’ вы установили matchbox-клавиатуру вы’ Вы найдете его в Главном меню, Аксессуары, Клавиатура. Это удобно для настроек без реальной клавиатуры.
Тестирование и проверка успеха настройки
Запуск диагностических инструментов для дисплея и сенсорного входа
Проверьте экран с помощью таких инструментов, как glxgears или воспроизведение HD-видео на плеере VLC. Для проверки сенсорного ввода введите:
evtest /dev/input/eventX
Замените eventX на правильное имя устройства из /dev/input.
Запуск приложений для подтверждения полной функциональности
Попробуйте открыть браузер Chromium или простые приложения графического интерфейса Python с помощью Tkinter / Kivy. Посмотрите, как выглядит дисплей и насколько хорошо реагирует сенсор на различные кнопки и меню.
Дополнительные советы для долгосрочного использования
Защита экрана от повреждения или износа
Используйте защитник от ослепления или попробуйте оптическую связь, если это возможно. Оптическая связь - это метод, который включает в себя связь TFT LCD и CTP с использованием оптических материалов. Этот процесс делает дисплей лучше и легче читать, избавляясь от воздушных пробелов, чтобы сократить отскок света.
Использование корпусов или стендов для лучшей эргономики
Подумайте о том, чтобы получить VESA-дружелюбные стенды или стенные кронштейны, сделанные для проектов с такими экранами. Это упрощает использование и защищает внутреннюю часть от пыли или ударов во время использования.
Обновление программного обеспечения для постоянной совместимости
Время от времени обновляйте свою систему. Тип:
sudo apt обновление & & sudo apt полное обновление -y & & sudo rpi-обновление
Это позволяет работать с будущими обновлениями, которые могут повлиять на выход HDMI или устройства USB, такие как емкостные сенсорные экраны.
Часто задаваемые вопросы
Вопрос: Могу ли я использовать этот экран с другими устройствами, помимо Raspberry Pi?
Вы также можете использовать его для практически всего, что может выходить HDMI, поэтому это может быть небольшой портативный монитор / дисплей для Android или iOS.
В: Поддерживается ли мультитачч?
Он имеет 10 пальцев мультитач, что фабрично.
В: Что делать, если мне не нужна внешняя клавиатура?
Есть также дополнительный сенсорный пакет клавиатуры matchbox, который вы можете установить, чтобы получить визуальную клавиатуру на экране.
Пользовательский 10″ Сенсорный ЖК-экран для Raspberry Pi от Kadi Display
Кади Дисплей имеет специальные решения, созданные только для систем, таких как те, которые используют доски Raspberry Pi. Они предлагают 10,1-дюймовый TFT ЖК-дисплей промышленного класса 1280 × 800 с CTP, который поставляется в настройках с интерфейсами LVDS и емкостными многосенсорными панелями.
Кади Дисплей предоставляет полные настроенные варианты, такие как стекло крышки по вашему запросу - LOGO / Цвет / Форма / Толщина, изменение яркости подсветки, настройка штрихов, выбор типов интерфейсов (HDMI / USB / MIPI), проектирование FPC / кабеля, создание корпусов и предложение оптического соединения для жесткого использования в промышленных условиях.
С более чем 20 лет в производстве LCM/TP/BONDING и фабрикой более 5000 квадратных метров, Kadi Display имеет профессиональную R& Команда D отвечает за платы адаптеров сигнала. Это обеспечивает плавное соединение между пользовательскими экранами и платформами, такими как Raspberry Pi. Свяжитесь с Kadi Display Для получения дополнительной информации и цитаты.
Предыдущий
Как мониторы с открытыми кадрами используются для промышленной автоматизации HMI
Следующая
Что такое порт MIPI DSI на Raspberry Pi и как он используется
Оставить комментарий

Последние блоги и новости
- How to Choose High Brightness LCD Displays for Outdoor Applications
- IPS против других панелей Как выбрать интерфейсы дисплея для встроенного и промышленного TFT-ЖК
- 7-дюймовые дисплеи MIPI DSI: лучшие спецификации и лучший выбор в 2026 году
- Широкотемпературные TFT-дисплеи для промышленных приложений
- Как решения AG, AF и AR решают критические проблемы с дисплеем
Блог и новости
-
 TN против IPS2024-7-9
 -
TN против IPS2024-7-9