


Что такое порт MIPI DSI на Raspberry Pi и как он используется
2025-09-25
00:00
Порт MIPI DSI на Малина Пи Это быстрая точка соединения, созданная для соединения ЖК-экранов прямо с графическим процессором Pi. Это помогает быстро отправлять информацию дисплея, используя очень мало энергии. Эта настройка супер полезна для небольших проектов и задач сенсорного экрана, где экономия места и энергии является большой проблемой. В отличие от HDMI или VGA, MIPI DSI (Mobile Industry Processor Interface – Display Serial Interface) позволяет графическому чипу говорить непосредственно с экраном, сокращая задержки и экономяя срок службы батареи.
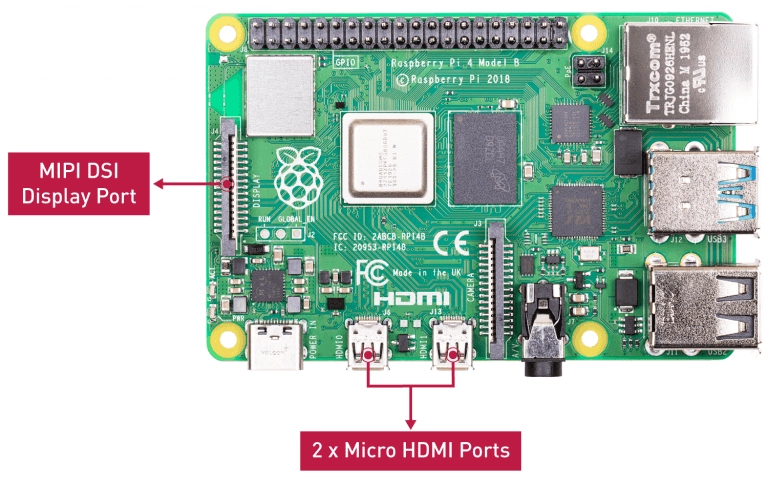
Вы найдете порты MIPI DSI практически на всех версиях Raspberry Pi, часто через 15-штрих, обозначенных как DSI1. Это делает его отличным выбором для острых, энергосберегающих дисплеев, необходимых в заводских настройках, портативных гаджетах и идеях IoT.
Как работает порт MIPI DSI на Raspberry Pi?
Порт MIPI DSI (Mobile Industry Processor Interface Display Serial Interface) создает прямую связь, используя один путь часа и несколько путей данных, обычно четыре. Эти пути отправляют видео и информацию управления прямо с GPU на чип драйвера экрана. Порт работает двумя способами: стиль Low Power (LP) для отправки команд и стиль High Speed (HS) для потоковой передачи видео.
Raspberry Pi демонстрирует свой 15-разрядный разъем MIPI DSI, в основном через DSI1 с четырьмя путями, на моделях от Pi 1 до Pi 4. Pi 5 улучшает управление DSI. Но этот порт не готов к использованию сразу. Ему нужна тщательная настройка аппаратного обеспечения, стабильный источник питания и настройки программного обеспечения, такие как накладки дерева устройств и соответствующие драйверы.
Какие типичные приложения для порта Raspberry Pi MIPI DSI?
Этот порт часто используется для крошечных встроенных настроек дисплея. Подумайте о собственных сенсорных дисплеях Raspberry Pi, индивидуальных ЖК-экранах или фабричных сенсорных панелях. Его низкое потребление энергии и хорошая скорость передачи данных делают его идеальным для гаджетов, работающих на батареях, или в узких пространствах, таких как портативные инструменты или умные домашние устройства.
Kadi Display предлагает MIPI DSI-дружелюбные ЖК и OLED варианты, которые плавно вписываются в Raspberry Pi. Они помогают строителям создавать встроенные системы, носимые технологии и высочайшие дисплеи с лучшей визуальностью и быстрым откликом.
Как MIPI DSI дисплей подключен к Raspberry Pi?
Подключение дисплея MIPI DSI означает правильное прикрепление плоского гибкого кабеля к месту DSI Raspberry Pi. Убедитесь, что металлические контакты расположены правильно. Часто для запуска подсветки или других частей необходимы дополнительные проводы питания, подключенные к заголовку GPIO.
Поскольку различные производители используют различные настройки штифтов для своих экранов, вам могут понадобиться адаптерные платы с разъемами нулевой силы вставки (ZIF), чтобы соответствовать кабелю экрана порту Pi. Использование противостояний или монтажных рам может остановить повреждения от ударов или напряжения. Kadi Display предлагает готовые к использованию комплекты и адаптеры, чтобы упростить этот процесс соединения.
Почему конфигурация программного обеспечения имеет решающее значение для использования порта MIPI DSI?
В отличие от HDMI, MIPI DSI не устанавливается самостоятельно. Вы должны обновить или настроить накладки дерева устройства ядра Linux, чтобы сообщить ОС Raspberry Pi о размере экрана, времени и деталях драйвера. Если вы пропустите это, даже хорошо подключенный дисплей не будет работать.
Иногда вам нужно создавать и добавлять конкретные драйверы панелей или мостов в ядро для чипов конвертера. Сенсорные функции также полагаются на настройку сенсорных элементов управления I2C/SPI. Кади Дисплей помогает пользователям с этими настройками драйвера для беспрепятственного запуска.
Какие проблемы распространены при использовании MIPI DSI на Raspberry Pi?
Несколько обычных проблем появляются с этим интерфейсом. Вы можете не увидеть изображения, если лентая кабель свободный или не выстроен правильно. Другие проблемы включают отсутствие накладок дерева устройства, неправильное питание экрана или несоответствующие драйверы.
Сенсорные экраны также могут отказаться, если их элементы управления не настроены должным образом в программном обеспечении. Кроме того, различные макеты штифтов по моделям экрана могут затруднить прямые соединения, поэтому могут потребоваться адаптеры. Экспертная помощь Kadi Display легко направляет пользователей через эти препятствия.
Как MIPI DSI и другие дисплейные интерфейсы Raspberry Pi сравниваются?
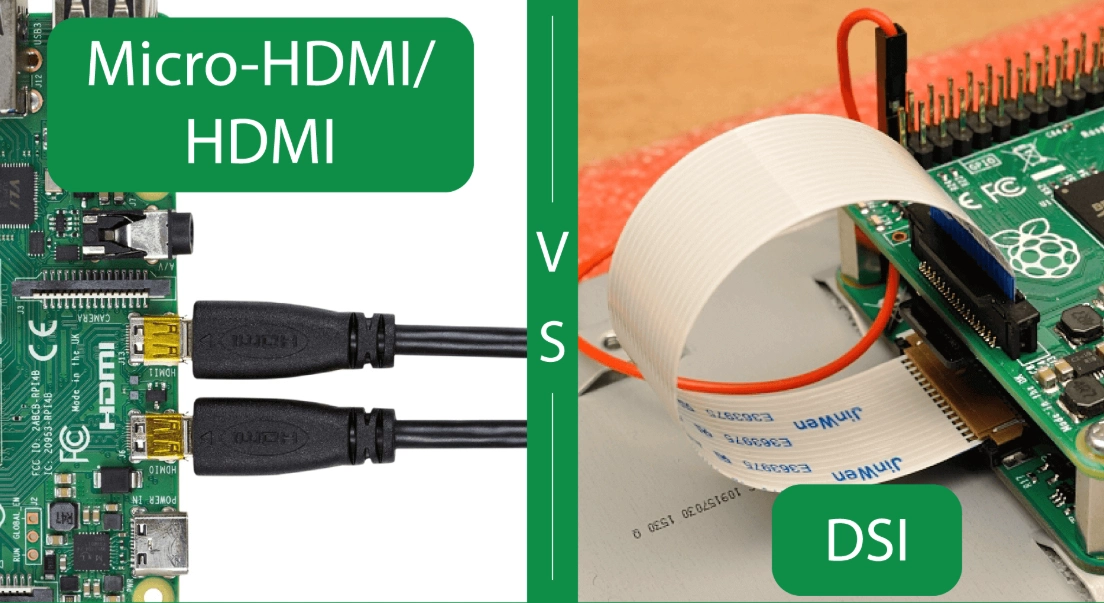
Raspberry Pi предлагает несколько вариантов подключения. HDMI работает практически со всем. DPI использует GPIO для параллельного разговора. Но MIPI DSI сияет с меньшим количеством проводок, низким энергопотреблением и резкими изображениями в небольших пространствах.
HDMI легко подключить и работает с большинством мониторов или телевизоров, но он использует больше энергии. DPI обновляется быстро, но занимает места GPIO. Для встроенных проектов, требующих аккуратной настройки без потери скорости или экономии энергии, MIPI DSI является лучшим выбором.
Может ли MIPI DSI поддерживать сенсорные экраны на Raspberry Pi?
Да, можно. Многие экраны MIPI DSI оснащены сенсорными функциями, либо емкостными, либо сопротивляющими, связанными через отдельные пути I2C или SPI. Чтобы работать с видео, вам нужны правильные драйверы и настройки дерева устройства.
Kadi Display обеспечивает полные настройки дисплея с многосенсорными панелями, привязанными к экранам MIPI DSI. Они убеждаются, что оба аппаратных сигнала хорошо работают вместе во время использования.
Каковы последние тенденции в технологии дисплея MIPI DSI?
Технология дисплея быстро становится лучшей. Новые вещи включают в себя больше путей данных для четкости 4K, поддержку HDR и изгибшиеся или складные OLED-экраны. Обновления программного обеспечения, такие как более мощные инструменты перекрытия в более новых версиях ОС Raspberry Pi, также упрощают настройку.
Kadi Display прилагает усилия к созданию новейшего экрана MIPI DSI. Они предлагают жесткие решения как для повседневных гаджетов, так и для тяжелого заводского оборудования, сочетая доверие с отличной визуальностью.
Kadi Display Экспертные взгляды
«MIPI DSI меняет игру для настроек экрана Raspberry Pi. Он позволяет небольшие, прочные решения без толстых кабелей или высокого энергопотребления. В Kadi Display мы стремимся предоставить панели MIPI DSI, которые сочетают тщательный дизайн с простотой использования, плюс экспертную помощь. Это позволяет строителям и компаниям смело создавать встроенные, носимые и IoT-дисплеи».
Резюме и практические советы
Порт MIPI DSI на Raspberry Pi жизненно важен для резких, низкоэнергетических настроек экрана во встроенных системах. Чтобы хорошо использовать его, выстройте кабели прямо во время установки и обеспечите стабильные линии электроэнергии. Так же, как ключ - правильно настроить накладки ядра, так и видео- и сенсорные входы работают без проблем.
Выберите партнеров, таких как Kadi Display, которые предоставляют пользовательские аппаратные и программные исправления. Всегда проверяйте свою настройку с известными хорошими настройками, прежде чем развернуть ее для реального использования.
Пользовательские дисплеи с портом MIPI DSI для Raspberry Pi от дисплея Kadi
Кади Дисплей фокусируется на изготовлении индивидуальных TFT-ЖК модулей только для использования Raspberry Pi с такими ссылками, как TTL / LVDS / MIPI / EDP / HDMI / Type-C. Они разрабатывают стекло крышки, как вы спрашиваете. Логотип, цвет, форма, толщина, FPC, кабель, корпус, подсветка, яркость и вывод могут быть адаптированы, чтобы вписаться в любой план продукта.
Их ассортимент охватывает яркие IPS-панели, такие как 5,0-дюймовый дисплей DSI MIPI 800 * 480 для Raspberry PI и квадратные ЖК-дисплеи, такие как 5,0-дюймовый квадратный ЖК-дисплей IPS 600 × 600 с интерфейсом MIPI. У них также есть выбор AMOLED с глубокими черными цветами и сверхбыстрым откликом - отлично подходит для пользовательских чувств высшего уровня.
С квалифицированным R& Кади использует специальные преимущества цепочки поставок Шэньчжэня, чтобы предложить быстрые ответы. Они обеспечивают полные модули с корпусом PCBA CTP, ускоряя время строительства, одновременно повышая уникальность продукта. Свяжитесь с Kadi Display сегодня!
Часто задаваемые вопросы
Что такое MIPI DSI на Raspberry Pi?
Это быстрая серийная связь для подключения ЖК / OLED экранов прямо к графическому процессору Raspberry Pi для плавного потока видеоданных.
Почему MIPI DSI не похож на HDMI?
Для правильной работы ему нужны специальные драйверы, накладки деревьев устройств и точные аппаратные ссылки.
Могу ли я использовать сенсорные экраны с MIPI DSI?
Да, но сенсорное управление часто требует отдельных настроек драйвера I2C или SPI.
Что делать, если мой дисплей MIPI DSI не показывает изображения?
Посмотрите на линейку кабелей, питание, настройку драйвера и настройки накладки ядра.
Предоставляет ли Kadi Display решения MIPI DSI для Raspberry Pi?
Да, они создают индивидуальные модули, построенные в соответствии с потребностями вашего проекта, включая настройки жилья и полную техническую помощь на всех этапах строительства.
Предыдущий
Как настроить 10-дюймовый сенсорный LCD для Raspberry Pi
Следующая
Все, что нужно знать об экранах Raspberry Pi
Оставить комментарий

Последние блоги и новости
Блог и новости
-
 TN против IPS2024-7-9
 -
 TN против IPS2024-7-9