


Casa
-
Blog & Notizie
-
Come costruire un display industriale affidabile con Raspberry Pi per un funzionamento 24 ore su 24, 7 giorni su 7.
Come costruire un display industriale affidabile con Raspberry Pi per un funzionamento 24 ore su 24, 7 giorni su 7.
2026-06-05
18:58
Come costruire un display industriale affidabile con Raspberry Pi per un funzionamento 24 ore su 24, 7 giorni su 7.
Dai progetti di schermi per hobbisti ai chioschi industriali basati su Raspberry Pi, dai terminali di segnaletica digitale ai sistemi HMI affidabili 24 ore su 24, 7 giorni su 7.
A cura del team tecnico di Kadi Display | www.kadidisplay.com
Perché i display Raspberry Pi 24 ore su 24, 7 giorni su 7, falliscono sul campo
Gli schermi Raspberry Pi sono diventati una scelta pratica per dashboard, chioschi, terminali di linea di produzione, pannelli di prenotazione sale, segnaletica per punti vendita e progetti HMI industriali compatti. La piattaforma è economica, ampiamente documentata e sufficientemente flessibile da eseguire HMI basate su browser, dashboard Node-RED, visualizzatori SCADA, interfacce Python/Qt o lettori di digital signage. Ecco perché le ricerche di "display industriale Raspberry Pi", "schermo Raspberry Pi 24 ore su 24, 7 giorni su 7", "digital signage industriale Raspberry Pi" e "chiosco Raspberry Pi affidabile" continuano a crescere tra OEM e integratori di sistemi.
Il problema è che un prototipo funzionante non è la stessa cosa di un display industriale affidabile, operativo 24 ore su 24, 7 giorni su 7. Un Raspberry Pi collegato a un monitor HDMI di tipo consumer su una scrivania può eseguire una demo per una settimana. Ma se si mette lo stesso sistema in un chiosco sigillato, lo si fa funzionare con il caldo estivo, si aggiungono funzionalità touch USB, alimentazione instabile, interruzioni del Wi-Fi, scritture su scheda SD, perdite di memoria del browser e un operatore che non lo riavvia mai, i punti deboli emergono rapidamente.
L'obiettivo ingegneristico non è semplicemente quello di far accendere lo schermo. L'obiettivo è quello di mantenere l'HMI leggibile, reattiva, ripristinabile, termicamente stabile e riparabile per mesi o anni. Ciò richiede una progettazione a livello di sistema: hardware del display, interfaccia touch, alimentatore, modulo di elaborazione, supporto di memorizzazione, sistema operativo, watchdog, contenitore, instradamento dei cavi e piano di manutenzione sono tutti elementi importanti.
Iniziate scegliendo la piattaforma Raspberry Pi giusta.
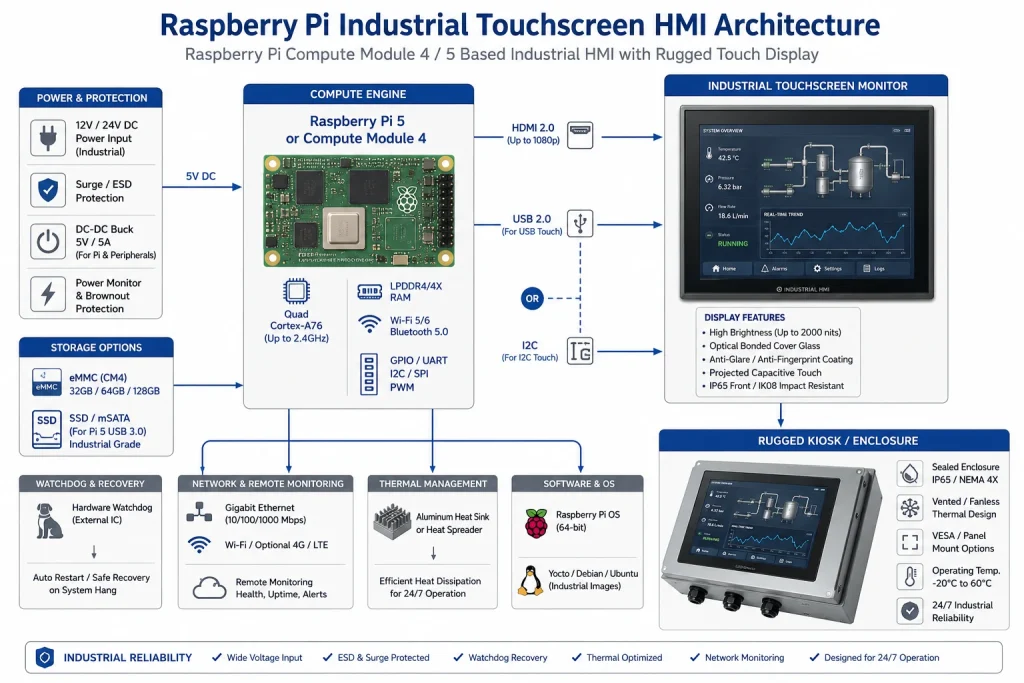
Per lo sviluppo di prototipi, un Raspberry Pi 4 o un Raspberry Pi 5 sono convenienti perché offrono immediatamente uscita HDMI, porte USB, Ethernet, Wi-Fi e un ambiente desktop. Per un prodotto destinato a essere integrato in un chiosco industriale, un involucro per la segnaletica digitale o un'interfaccia HMI compatta per macchinari, il Compute Module 4 è spesso una base di partenza migliore, poiché è progettato per l'integrazione in schede di interfaccia.
Raspberry Pi dichiara ufficialmente che sono disponibili diverse varianti del Compute Module 4 con un intervallo di temperatura esteso da -40 °C a +85 °C per ambienti interni ed esterni più estremi. La scheda tecnica del Compute Module 4 elenca anche un ingresso a 5 V, un'interfaccia di visualizzazione MIPI DSI a 4 corsie, una temperatura operativa da -20 °C a +85 °C per le varianti standard, da -40 °C a +85 °C per le varianti a temperatura estesa e la disponibilità in produzione almeno fino a gennaio 2034. Questi dettagli sono importanti quando un'interfaccia HMI basata su Raspberry Pi deve rimanere supportata per un lungo ciclo di vita del prodotto.
Un chiosco Raspberry Pi affidabile dovrebbe quindi partire da due questioni fondamentali. In primo luogo, qual è la soluzione migliore per lo sviluppo? In secondo luogo, qual è la soluzione migliore per l'implementazione? Un Raspberry Pi in formato scheda è ideale per le prime fasi di sviluppo del software e dell'interfaccia utente. Un Compute Module con una scheda di interfaccia dedicata è generalmente preferibile quando il sistema necessita di un'alimentazione controllata, memoria eMMC, fori di montaggio, connettori industriali, I/O isolati e accesso alla manutenzione prevedibile.
Il display non è solo una periferica
Nei progetti per il mercato consumer, il display è spesso considerato un accessorio. Nella progettazione di interfacce uomo-macchina industriali, invece, il display è parte integrante del sistema di affidabilità. Determina la leggibilità, la reattività al tocco, il consumo energetico, la temperatura dell'involucro, il tasso di guasti sul campo e la fiducia dell'utente.
La categoria di display per Raspberry Pi di Kadi Display elenca moduli TFT e touchscreen per applicazioni embedded, industriali e compatte basate su Raspberry Pi, tra cui DSI-MIPI per Raspberry Pi, opzioni touch USB o I2C, configurazioni di incollaggio ottico e categorie di luminosità da livelli per interni fino a 800 cd/m² e oltre. Questo rende la categoria di display un naturale punto di riferimento per questo articolo: Display per Raspberry Pi di Kadi Display.
Per uno schermo Raspberry Pi da utilizzare 24 ore su 24, 7 giorni su 7, le specifiche dovrebbero includere dimensioni, risoluzione, luminosità, angolo di visione, durata della retroilluminazione, tipo di tocco, interfaccia, temperatura di esercizio, temperatura di stoccaggio, tipo di incollaggio, vetro di copertura, metodo di bloccaggio del connettore e montaggio del contenitore. Un display LCD dall'aspetto gradevole ma privo di un design stabile della retroilluminazione, di una classificazione per temperature industriali o di un'interfaccia touch sicura può diventare il punto debole più evidente dell'intero sistema.
HDMI + USB Touch vs MIPI DSI: qual è la soluzione migliore per un utilizzo 24 ore su 24, 7 giorni su 7?
I due percorsi più comuni per i display industriali Raspberry Pi sono HDMI più USB touch e MIPI DSIOgnuno ha il suo posto.
L'HDMI è la scelta più pratica per molti chioschi e sistemi di digital signage. È plug-and-play, supporta risoluzioni standard e funziona facilmente con Linux. La guida alle interfacce di Kadi Display sottolinea che l'HDMI è ampiamente utilizzato e negozia automaticamente le impostazioni del display tramite EDID, mentre USB o I2C vengono solitamente utilizzati separatamente per il touch. Per gli integratori che necessitano di implementazione rapida e sostituzione semplice, la combinazione HDMI + USB per il touch è spesso la soluzione più sicura.
MIPI DSI è più pulito per sistemi embedded compattiKadi Display osserva che Raspberry Pi supporta HDMI, DPI e MIPI DSI e che MIPI DSI collega i pannelli LCD in modo più diretto, ma non è così immediato come HDMI. In pratica, la spiegazione è semplice: DSI può essere un'ottima soluzione quando schermo, FPC, firmware e contenitore sono progettati come un unico prodotto, ma HDMI è più pratico quando il chiosco richiede flessibilità di manutenzione, cavi lunghi e un'ampia compatibilità software.
Progettazione dell'alimentazione: la parte più noiosa che salva il maggior numero di sistemi
Molti problemi di instabilità nelle installazioni di digital signage basate su Raspberry Pi non dipendono dal software, bensì dall'alimentazione. La documentazione di Raspberry Pi afferma che tutti i modelli richiedono un'alimentazione a 5,1 V, con un fabbisogno di corrente variabile a seconda del modello, e raccomanda un alimentatore USB-C da 3 A per Raspberry Pi 4 e un alimentatore USB-C da 27 W per Raspberry Pi 5. Nella stessa documentazione, Raspberry Pi segnala inoltre che la rinegoziazione dell'alimentazione su alcuni alimentatori multiporta USB-PD di terze parti può causare un avvio anomalo se viene collegato un altro dispositivo.
Un display industriale basato su Raspberry Pi non dovrebbe dipendere dal caricabatterie per cellulari più economico disponibile. Utilizza un alimentatore industriale stabilizzato, definisci il comportamento in caso di calo di tensione, proteggi il sistema da sovratensioni e scariche elettrostatiche (ESD) e calcola la corrente totale assorbita dal Raspberry Pi, dalla retroilluminazione dello schermo, dal controller touch, dai dispositivi USB, dal modem LTE, dalla ventola, dalla scheda relè e da eventuali sensori esterni. Se il display utilizza un ingresso a 12 V e il Raspberry Pi utilizza 5 V, specifica attentamente il convertitore DC-DC e lascia un margine per l'avvio a freddo e per la corrente di picco della retroilluminazione.
Per i sistemi di chioschi e segnaletica digitale, il PoE può semplificare il cablaggio, ma è fondamentale dimensionare correttamente i cavi. La documentazione di Raspberry Pi afferma che Raspberry Pi 5 Ethernet è compatibile con PoE+ e che Raspberry Pi 4B/3B+ Ethernet è compatibile con PoE se si utilizza l'HAT appropriato. Per un sistema composto da schermo e Raspberry Pi, è necessario verificare il consumo energetico totale prima di presumere che un singolo cavo Ethernet sia sufficiente per alimentare l'intero sistema.
Archiviazione: perché le schede SD non sono la scelta predefinita ideale per il funzionamento automatico.
Una scheda microSD è comoda durante lo sviluppo, ma raramente rappresenta la scelta migliore per un funzionamento continuo e senza supervisione 24 ore su 24, 7 giorni su 7. Cache del browser, log, scritture nel database, aggiornamenti dei pacchetti, interruzioni di corrente e ripetuti cicli di riavvio possono aumentare il carico di scrittura. Quando il file system si corrompe, il chiosco potrebbe bloccarsi all'avvio, il che è inaccettabile per un display in produzione.
Per un chiosco industriale basato su Raspberry Pi, le scelte preferibili sono le memorie eMMC su varianti del Compute Module o un design SSD/NVMe laddove il case lo consenta. Se si deve necessariamente utilizzare una microSD, è fondamentale ridurre drasticamente le operazioni di scrittura. Utilizzare la rotazione dei log, tmpfs per i file volatili, un filesystem root di sola lettura laddove possibile, la registrazione remota dei log e finestre di aggiornamento controllate. La regola è semplice: qualsiasi cosa che scriva costantemente dovrebbe essere messa in discussione.
Un'interfaccia HMI affidabile per Raspberry Pi dovrebbe anche essere in grado di ripristinarsi dopo un'interruzione di corrente senza dover accedere manualmente tramite tastiera. Ciò significa che gli script di avvio, l'avvio automatico del chiosco, la logica di riconnessione di rete, i controlli del filesystem e il ripristino delle applicazioni devono essere testati interrompendo fisicamente l'alimentazione ripetutamente, e non solo facendo clic su "riavvia" dal desktop.
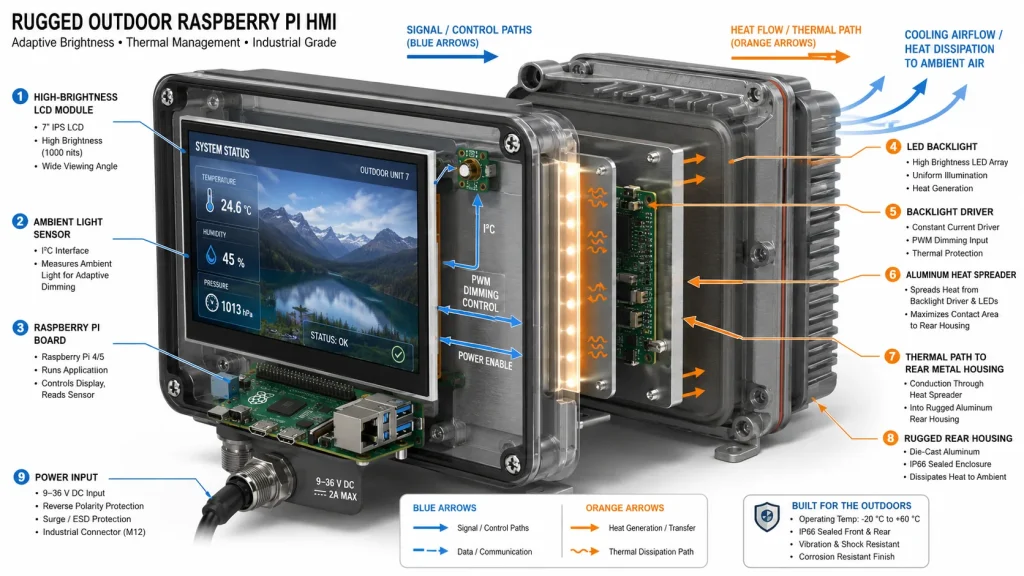
Progettazione termica per schermi Raspberry Pi in funzione 24 ore su 24, 7 giorni su 7
Il design termico si articola su due livelli: il processore Raspberry Pi e la retroilluminazione del display. La documentazione di Raspberry Pi indica che il Raspberry Pi 3 Model B+ ha introdotto un limite di temperatura flessibile per massimizzare il tempo di funzionamento rapido prima di raggiungere il limite massimo di 85 °C e che il comportamento della ventola del Raspberry Pi 5 aumenta gradualmente la velocità all'aumentare della temperatura. Queste note termiche ufficiali sono importanti perché un involucro per chiosco può intrappolare il calore anche quando la temperatura ambiente è confortevole.
Il display aggiunge un proprio carico termico. Un monitor touchscreen industriale ad alta luminosità, soprattutto da 800 o 1000 nit, produce più calore dalla retroilluminazione rispetto a uno schermo desktop a bassa luminosità. Le pagine dei prodotti Kadi Display sottolineano l'elevata luminosità, il bonding ottico, l'ampio intervallo di temperatura di funzionamento, la stabilità della retroilluminazione e la possibilità di personalizzare retroilluminazione, alloggiamento, vetro di copertura e interfaccia. Sono proprio questi gli aspetti da considerare quando un progetto di digital signage industriale basato su Raspberry Pi deve funzionare 24 ore su 24, 7 giorni su 7.
Un obiettivo pratico di progettazione è misurare la temperatura interna dell'involucro dopo diverse ore alla massima luminosità, al massimo carico della CPU e alle condizioni ambientali più calde previste. Successivamente, ripetere il test con i filtri antipolvere parzialmente bloccati, se il sistema utilizza la ventilazione. Se il chiosco è sigillato, l'involucro deve fungere da dissipatore di calore.
Affidabilità del software: la modalità chiosco è solo l'inizio
Il tutorial ufficiale di Raspberry Pi sulla modalità kiosk spiega che quest'ultima si avvia direttamente in una pagina web o applicazione a schermo intero, senza un normale ambiente desktop, e che questa è la base per progetti dedicati alla visualizzazione e all'interazione con le informazioni. Questo è il punto di partenza corretto, ma non rappresenta l'intera soluzione per garantire l'affidabilità del sistema.
Un chiosco di produzione necessita di un servizio applicativo supervisionato, non di una finestra aperta manualmente. Utilizzare systemd per avviare l'HMI o il browser. Riavviarlo in caso di errore. Disabilitare gli elementi dell'interfaccia utente non necessari. Bloccare lo spegnimento dello schermo. Definire il comportamento del dispositivo in caso di interruzione della rete. Memorizzare nella cache locale i contenuti critici. Monitorare la crescita della memoria se Chromium è in esecuzione tutto il giorno. Pianificare riavvii controllati durante i periodi di basso traffico se è noto che lo stack applicativo presenta perdite di memoria.
Per un'interfaccia HMI basata su browser, progetta l'applicazione web per un funzionamento anche in condizioni di basso livello. Se l'API non è disponibile, mostra un chiaro stato offline anziché una schermata bianca vuota. Se una connessione WebSocket fallisce, riprova in modo controllato. Se il touchscreen non viene rilevato, registra l'evento nei log. Gli operatori non dovrebbero mai dover indovinare se il problema risiede nella macchina, nella rete, nel browser o nello schermo.
Veicoli di sorveglianza, monitoraggio remoto e ripristino
Un chiosco Raspberry Pi affidabile dovrebbe prevedere i guasti e ripristinarsi automaticamente. Ciò significa utilizzare un watchdog hardware, laddove supportato, un watchdog software per il processo dell'applicazione, controlli di integrità della rete, indicatori di stato locali e telemetria remota. Il watchdog dovrebbe riavviare il sistema solo quando il servizio è effettivamente bloccato, non in caso di brevi ritardi della rete.
Il set minimo di monitoraggio dovrebbe includere la temperatura della CPU, lo spazio libero su disco, il tempo di attività, lo stato dei processi delle applicazioni, lo stato della retroilluminazione del display (se disponibile), lo stato della rete e l'ora dell'ultimo aggiornamento dei contenuti. Per le interfacce HMI industriali, è opportuno registrare anche gli errori del controller touch e gli eventi di riconnessione USB. Il monitoraggio remoto non deve essere complesso; anche un invio periodico di un segnale di attività a un server è sufficiente per verificare se il chiosco è attivo.
Per le implementazioni critiche, è fondamentale rendere visibile il ripristino. Una piccola pagina di servizio può mostrare l'ID del dispositivo, la versione del software, l'indirizzo IP, l'ultimo aggiornamento, l'utilizzo dello spazio di archiviazione, lo stato termico e la modalità di luminosità del display. I tecnici dell'assistenza dovrebbero essere in grado di diagnosticare la maggior parte dei guasti senza aprire il case.
Scelta del monitor touchscreen industriale
Per un utilizzo 24 ore su 24, 7 giorni su 7, lo schermo dovrebbe essere selezionato come un componente industriale. Kadi Display Monitor touch IPS da 12,3 pollici La pagina afferma che l'HDMI fornisce un'uscita video universale e che il touch USB funziona generalmente come un dispositivo HID standard su Windows e Linux; inoltre, nota che Raspberry Pi e Jetson possono funzionare comunemente tramite HDMI + touch USB con possibili impostazioni per la rotazione o la mappatura del tocco. La stessa pagina afferma che il funzionamento 24 ore su 24, 7 giorni su 7, dipende dalla configurazione e dalla progettazione termica, che è la risposta tecnica corretta e non una vaga promessa di marketing.
Per cruscotti o interfacce veicolo di formato più ampio, Kadi Display Schermo LCD industriale touchscreen da 15 pollici con risoluzione 1920 × 720 e luminosità di 1000 nit. È descritto come progettato per un funzionamento continuo 24 ore su 24, 7 giorni su 7, e adatto a terminali self-service per esterni, cruscotti automobilistici e macchinari industriali pesanti. Supporta interfacce industriali standard come HDMI, VGA e LVDS e si distingue per la visibilità alla luce solare di 1000 nit, il touch capacitivo, la robustezza e l'ampio intervallo di temperatura di funzionamento.
Questi sono target di collegamento interno utili perché si connettono in modo naturale a Raspberry Pi industrial display, Raspberry Pi kiosk affidabile, monitor touchscreen industriale e Raspberry Pi digital signage industriale intent di ricerca.
Lista di controllo per la progettazione 24 ore su 24, 7 giorni su 7
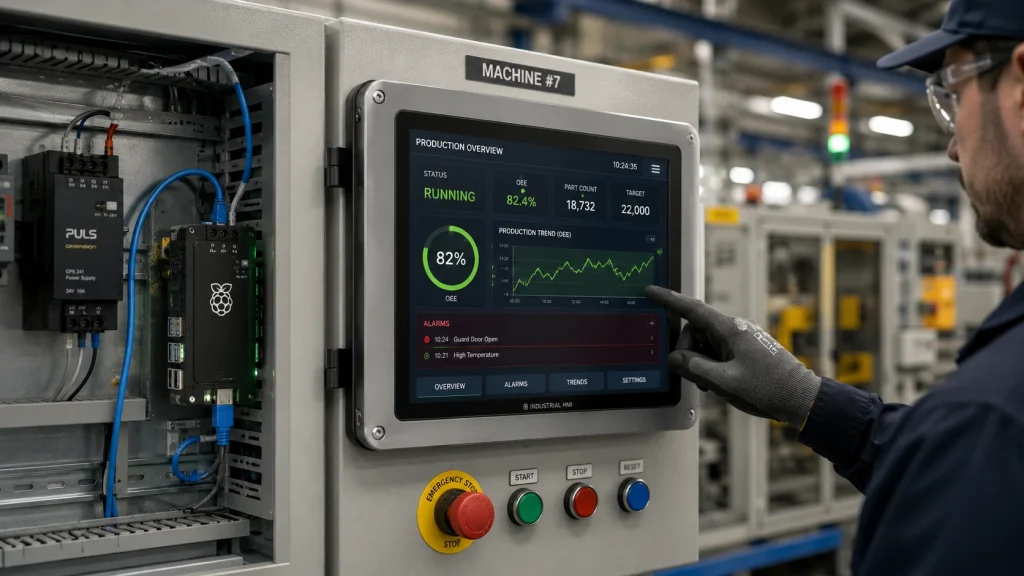
Esempio di realizzazione: Chiosco affidabile basato su Raspberry Pi per un ambiente di produzione industriale.
Un pratico chiosco industriale operativo 24 ore su 24, 7 giorni su 7, potrebbe utilizzare un Raspberry Pi Compute Module, memoria eMMC, una scheda di interfaccia con regolazione di tensione industriale da 12 V a 5 V, un monitor touchscreen industriale da 10,1 o 12,3 pollici, HDMI o MIPI DSI a seconda dei vincoli dell'involucro, touch capacitivo USB o I2C, Ethernet come rete principale, Wi-Fi solo come backup, un alloggiamento posteriore in metallo e un'applicazione kiosk systemd monitorata.
Il software si avvierebbe direttamente nell'HMI, manterrebbe sotto controllo la cache del browser, scriverebbe i log su tmpfs o su un server remoto, riavvierebbe il browser in caso di errore, esporrebbe una pagina di manutenzione locale e segnalerebbe i dati di heartbeat ogni minuto. Il contenitore verrebbe testato con la massima retroilluminazione e il massimo carico della CPU. Il sistema di alimentazione verrebbe testato con ripetute interruzioni dell'input. L'interfaccia touch verrebbe testata con guanti, polvere, liquido detergente e lunghi periodi di inattività.
Questa è la differenza tra un progetto Raspberry Pi e un display industriale Raspberry Pi. La distinta base potrebbe essere ancora molto inferiore a quella di un tradizionale PC con pannello PLC, ma l'affidabilità deriva da un'ingegneria rigorosa, non dalla sola scheda Raspberry Pi.
Conclusione: Un chiosco Raspberry Pi affidabile è un sistema
Un Raspberry Pi può certamente essere utilizzato come nucleo di calcolo di un display industriale affidabile e operativo 24 ore su 24, 7 giorni su 7, ma non se lo schermo, la memoria, l'alimentazione, il software e l'involucro vengono trattati con superficialità. La scheda è solo una parte del sistema. Il lavoro più importante consiste nella scelta di un monitor touchscreen industriale, nell'utilizzo di un'alimentazione stabile, nell'evitare pratiche di archiviazione delicate, nella gestione del calore, nella supervisione dell'applicazione del chiosco e nella predisposizione di una procedura di ripristino in caso di problemi.
Per progetti di display HMI a basso costo, Raspberry Pi può ridurre i costi hardware e accelerare lo sviluppo software rispetto ai tradizionali pannelli PLC o PC a pannello. Per le implementazioni industriali, tuttavia, il vantaggio del basso costo dovrebbe essere investito saggiamente nei componenti che garantiscono la continuità operativa: LCD industriale, incollaggio ottico ove necessario, connettori sicuri, storage eMMC o SSD, test termici e monitoraggio remoto.
Il miglior display industriale basato su Raspberry Pi non è quello con lo schermo più economico collegato alla scheda più economica. È il sistema che continua a mostrare le informazioni corrette, con la giusta luminosità e la giusta risposta al tocco, anche dopo migliaia di ore di funzionamento. Questo è lo standard che un chiosco Raspberry Pi affidabile deve soddisfare prima di meritare un posto in fabbrica.
Note sulla fonte
Tutorial ufficiale per chioschi interattivi con Raspberry Pi: La modalità chiosco si avvia direttamente in una pagina web o applicazione a schermo intero ed è utilizzata per progetti specifici di visualizzazione di informazioni e interazione con l'utente.
Pagina ufficiale del prodotto Raspberry Pi Compute Module 4: Sono disponibili diverse varianti del CM4 con un intervallo di temperatura esteso da -40 °C a +85 °C per ambienti interni ed esterni più estremi.
Scheda informativa del prodotto Raspberry Pi Compute Module 4: CM4 elenca un ingresso CC a 5 V, un'interfaccia MIPI DSI a 4 corsie, una temperatura operativa standard da -20 °C a +85 °C, varianti estese da -40 °C a +85 °C, un MTBF (tempo medio tra i guasti) di 377.000 ore e una durata di produzione almeno fino a gennaio 2034.
Documentazione hardware del Raspberry Pi: Requisiti di alimentazione, note PoE, comportamento termico e raccomandazioni ufficiali per il raffreddamento delle schede Raspberry Pi.
Categoria display Kadi per Raspberry Pi: DSI-MIPI, categorie di luminosità, interfacce touch, incollaggio ottico e applicazioni di visualizzazione Raspberry Pi per sistemi embedded/industriali.
Guida Kadi Display HDMI vs DSI: Confronto tra HDMI e MIPI DSI per l'integrazione di display e touch su Raspberry Pi.
Monitor touch industriale Kadi Display da 12,3 pollici con connessione HDMI: Compatibilità touch HDMI + USB e design 24 ore su 24, 7 giorni su 7, a seconda della configurazione e del design termico.
Display Kadi: schermo LCD industriale touchscreen da 15 pollici con risoluzione 1920 x 720 e luminosità di 1000 nit. Posizionamento caratterizzato da elevata luminosità, struttura robusta, interfacce standard e funzionamento continuo 24 ore su 24, 7 giorni su 7.
Disclaimer
Questo articolo è destinato alla formazione ingegneristica e alla pianificazione di contenuti SEO. Le specifiche del prodotto, la temperatura di esercizio, l'MTBF, la durata della retroilluminazione, il supporto delle interfacce e il funzionamento 24 ore su 24, 7 giorni su 7 dipendono dalla variante specifica di Raspberry Pi, dalla configurazione del display, dal contenitore, dall'alimentatore, dallo stack software e dall'ambiente di lavoro. Verificare le ipotesi di progettazione finali con le relative schede tecniche del prodotto e i fornitori prima della produzione o della pubblicazione di dichiarazioni di approvvigionamento. Raspberry Pi è un marchio di Raspberry Pi Ltd. I nomi dei marchi appartengono ai rispettivi proprietari.
PREVIDENTE
Schermi per Raspberry Pi leggibili alla luce del sole
Prossimo
Come scegliere un produttore di display per progetti di apparecchiature industriali e medicali
Lascia un commento

Ultimi Blog & Notizie
- Why Does an LVDS Display Flicker in Industrial Equipment? Causes and Design Checks
- MIPI DSI Display Not Turning On: Interface, Driver and Initialization Checks for Embedded HMI
- How to Choose Display Interfaces for Rugged Industrial HMI and Panel PC Projects
- How to Connect a Custom TFT Display Module to a ProAV or Control Room System: HDMI, LVDS, eDP, MIPI and USB
- Industrial Touchscreen Displays for Kiosks, POS and Self-Service Terminals: How to Choose the Right TFT Touch Display
Blog & Notizie correlate
-
 TN contro IPS2024-7-9
 -
 TN contro IPS2024-7-9