Huis
-
Blog & Nieuws
-
Hoe bouw je een betrouwbaar industrieel display met Raspberry Pi voor continu gebruik?
Hoe bouw je een betrouwbaar industrieel display met Raspberry Pi voor continu gebruik?
2026-06-05
18:58
Hoe bouw je een betrouwbaar industrieel display met Raspberry Pi voor continu gebruik?
Van schermprojecten voor hobbyisten tot industriële Raspberry Pi-kiosken, digitale signage-terminals en betrouwbare 24/7 HMI-systemen.
Door het technische team van Kadi Display | www.kadidisplay.com
Waarom Raspberry Pi-schermen die 24/7 draaien in de praktijk falen
Raspberry Pi-schermen zijn een praktische keuze geworden voor dashboards, kiosken, terminals voor productielijnen, reserveringspanelen, winkelreclame en compacte industriële HMI-projecten. Het platform is betaalbaar, goed gedocumenteerd en flexibel genoeg om browsergebaseerde HMI's, Node-RED-dashboards, SCADA-viewers, Python/Qt-interfaces of digitale signage-spelers te draaien. Daarom neemt de vraag naar industriële Raspberry Pi-displays, 24/7 Raspberry Pi-schermen, industriële digitale signage met Raspberry Pi en betrouwbare Raspberry Pi-kiosken toe onder OEM's en systeemintegratoren.
Het probleem is dat een werkend prototype niet hetzelfde is als een betrouwbaar industrieel display dat 24/7 draait. Een Raspberry Pi aangesloten op een consumenten-HDMI-monitor op een bureau kan een demo een week lang draaien. Plaats hetzelfde systeem in een afgesloten kiosk, laat het draaien in de zomerhitte, voeg USB-touch, instabiele stroomvoorziening, wifi-uitval, schrijfbewerkingen naar SD-kaarten, geheugenlekken in de browser en een operator die het systeem nooit opnieuw opstart toe, en de zwakke punten komen snel aan het licht.
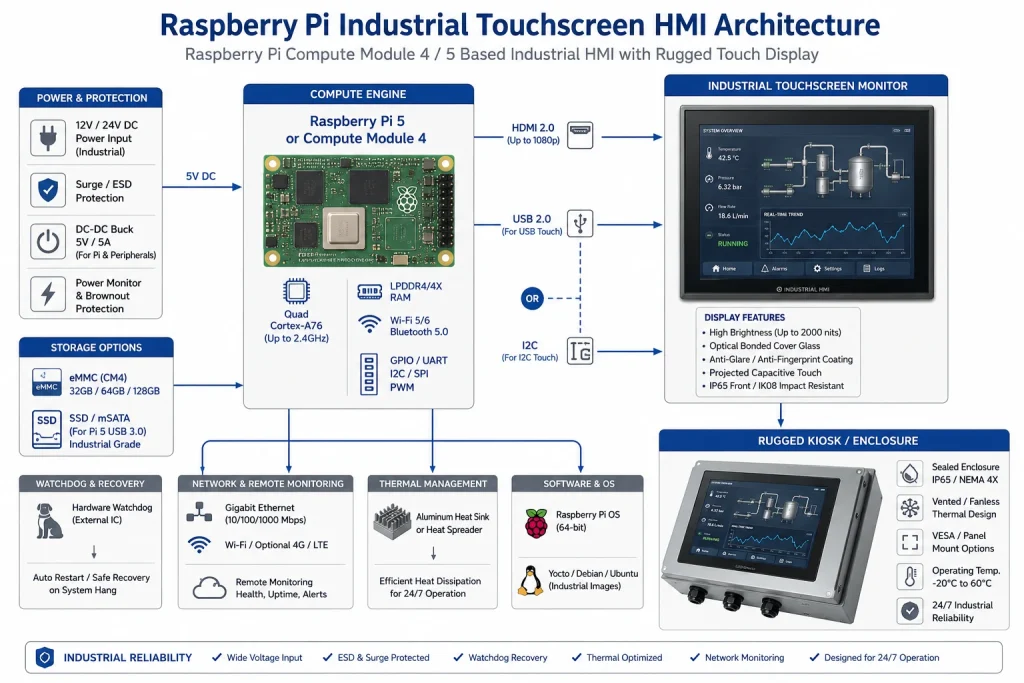
Het technische doel is niet alleen om het scherm aan te zetten. Het doel is om de HMI leesbaar, responsief, herstelbaar, thermisch stabiel en onderhoudbaar te houden gedurende maanden of jaren. Dat vereist een ontwerp op systeemniveau: de displayhardware, de touchscreeninterface, de voeding, de rekenmodule, het opslagmedium, het besturingssysteem, de watchdog, de behuizing, de kabelgeleiding en het onderhoudsplan zijn allemaal van belang.
Begin met het juiste Raspberry Pi-platform.
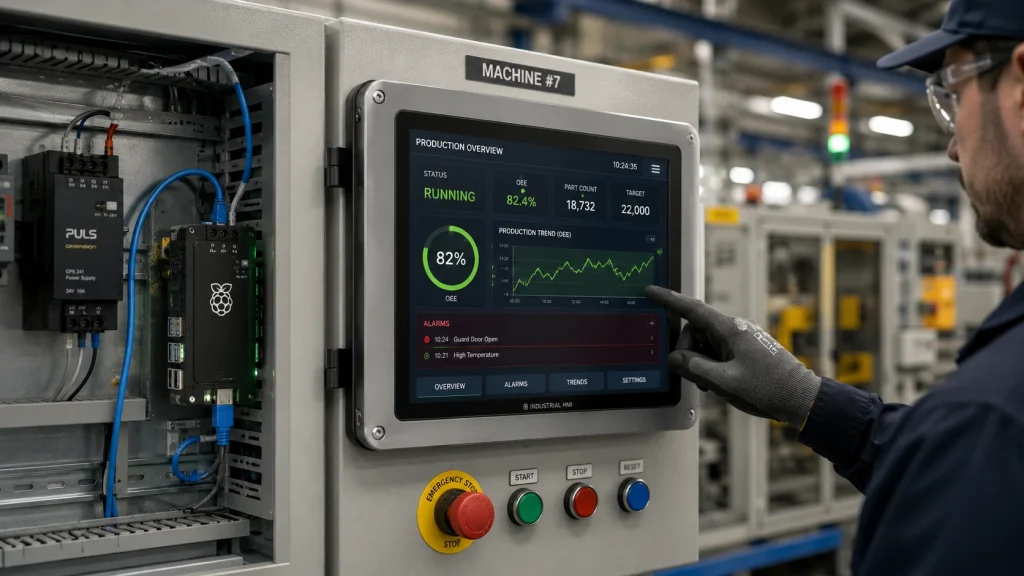
Voor de ontwikkeling van proof-of-concept-oplossingen is een Raspberry Pi 4 of Raspberry Pi 5 handig, omdat HDMI-uitgang, USB-poorten, Ethernet, Wi-Fi en de desktopomgeving direct beschikbaar zijn. Voor een product dat wordt gebruikt in een industriële kiosk, een digitale signage-behuizing of een compacte machine-HMI, is de Compute Module 4 vaak een betere basis, omdat deze is ontworpen voor integratie in carrierboards.
Raspberry Pi meldt officieel dat er verschillende varianten van de Compute Module 4 beschikbaar zijn met een uitgebreid temperatuurbereik van -40°C tot +85°C voor extremere binnen- en buitenomstandigheden. De productbeschrijving van de Compute Module 4 vermeldt ook een 5V-ingang, een 4-lane MIPI DSI-displayinterface, een bedrijfstemperatuur van -20°C tot +85°C voor standaardvarianten, -40°C tot +85°C voor varianten met een uitgebreider temperatuurbereik, en een verwachte productiebeschikbaarheid tot ten minste januari 2034. Deze details zijn belangrijk wanneer een Raspberry Pi HMI gedurende een lange productlevenscyclus ondersteuning moet blijven bieden.
Een betrouwbare Raspberry Pi-kiosk begint daarom met het beantwoorden van twee vragen. Ten eerste: wat is het meest geschikt voor ontwikkeling? Ten tweede: wat is het meest geschikt voor implementatie? Een Raspberry Pi in boardvorm is goed voor de eerste software- en UI-ontwikkeling. Een Compute Module met een speciaal carrierboard is doorgaans beter wanneer het systeem behoefte heeft aan gecontroleerde stroomvoorziening, eMMC-opslag, montagegaten, industriële connectoren, geïsoleerde I/O en voorspelbare toegang tot service.
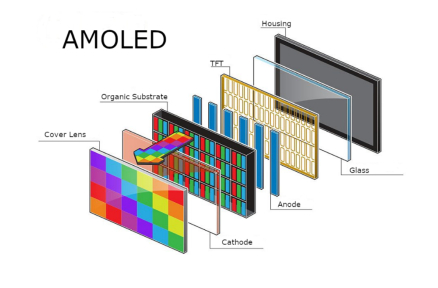
Het beeldscherm is niet zomaar een randapparaat.
Bij consumentenprojecten wordt het scherm vaak als een accessoire beschouwd. In industrieel HMI-ontwerp maakt het scherm echter deel uit van het betrouwbaarheidssysteem. Het bepaalt de leesbaarheid, de aanraakrespons, het energieverbruik, de temperatuur van de behuizing, het uitvalpercentage in de praktijk en het vertrouwen van de gebruiker.
De categorie Raspberry Pi-displays van Kadi Display biedt TFT- en touchscreenmodules voor embedded, industriële en compacte Raspberry Pi-toepassingen, waaronder DSI-MIPI voor Raspberry Pi, USB- of I2C-touchopties, optische bondingconfiguraties en helderheidscategorieën van binnenniveau tot 800 cd/m² en hoger. Daarom is deze categorie een logische interne link voor dit artikel: Raspberry Pi-displays van Kadi Display.
Voor een Raspberry Pi-scherm dat 24/7 in gebruik is, moeten de specificaties de volgende informatie bevatten: grootte, resolutie, helderheid, kijkhoek, levensduur van de achtergrondverlichting, touchscreen, interface, bedrijfstemperatuur, opslagtemperatuur, verbindingstype, afdekglas, vergrendelingsmethode van de connector en montage in de behuizing. Een mooi ogend LCD-scherm zonder stabiele achtergrondverlichting, industriële temperatuurbestendigheid of veilige touchscreen-interface kan het meest zichtbare zwakke punt in het hele systeem worden.
HDMI + USB Touch versus MIPI DSI: welke is beter voor 24/7 gebruik?
De twee meest voorkomende manieren om een Raspberry Pi te gebruiken voor industriële displays zijn: HDMI plus USB-touch en MIPI DSIIeder heeft zijn eigen plek.
HDMI is voor veel kiosken en digitale signage-systemen een praktische keuze. Het is plug-and-play, ondersteunt standaardresoluties en werkt probleemloos met Linux. De interfacegids van Kadi Display vermeldt dat HDMI veel gebruikt wordt en automatisch display-instellingen via EDID onderhandelt, terwijl USB of I2C meestal apart gebruikt wordt voor touchbediening. Voor integrators die snelle implementatie en eenvoudige vervanging nodig hebben, is HDMI + USB touch vaak de veiligere optie.
MIPI DSI is schoner voor compacte ingebedde systemenKadi Display merkt op dat Raspberry Pi HDMI, DPI en MIPI DSI ondersteunt, en dat MIPI DSI LCD-panelen directer aansluit, maar niet zo gebruiksvriendelijk is als HDMI. De praktische interpretatie is eenvoudig: DSI kan uitstekend zijn wanneer het scherm, de printplaat, de firmware en de behuizing als één product zijn ontworpen, maar HDMI is handiger wanneer de kiosk flexibiliteit in service, lange kabeltrajecten en brede softwarecompatibiliteit vereist.
Energieontwerp: het saaiste onderdeel dat de meeste systemen redt.
Veel instabiele digitale signage-implementaties met Raspberry Pi's hebben geen softwareproblemen, maar problemen met de voeding. De Raspberry Pi-documentatie vermeldt dat alle modellen een voeding van 5,1 V nodig hebben, waarbij de stroombehoefte per model verschilt. Voor de Raspberry Pi 4 wordt een USB-C-voeding van 3 A aanbevolen, en voor de Raspberry Pi 5 een USB-C-voeding van 27 W. In dezelfde documentatie merkt Raspberry Pi ook op dat het opnieuw onderhandelen over de stroomtoevoer bij sommige USB-PD-multipoortvoedingen van derden onbedoeld opstartgedrag kan veroorzaken als er een ander apparaat wordt aangesloten.
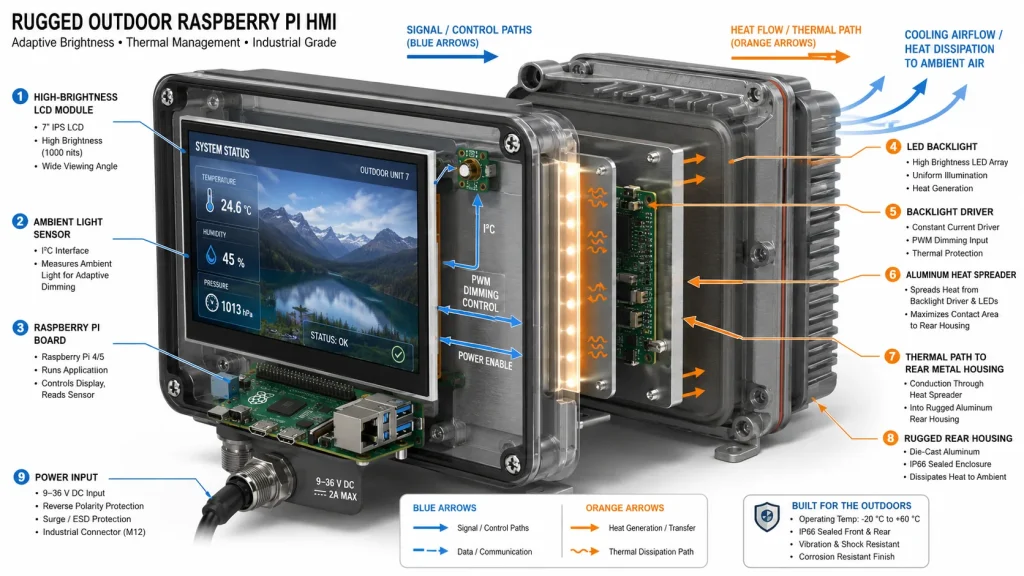
Een industrieel Raspberry Pi-display mag niet afhankelijk zijn van de goedkoopste telefoonoplader die er te vinden is. Gebruik een gereguleerde industriële voeding, definieer het gedrag bij spanningsdalingen, bescherm het systeem tegen overspanning en elektrostatische ontlading (ESD) en bereken de gecombineerde stroom van de Pi, schermverlichting, touchcontroller, USB-apparaten, LTE-modem, ventilator, relaiskaart en eventuele externe sensoren. Als het display een 12V-ingang gebruikt en de Pi 5V, kies dan zorgvuldig de DC-DC-converter en houd rekening met een marge voor koude start en piekstroom van de achtergrondverlichting.
Voor kiosk- en signage-systemen kan PoE de bekabeling vereenvoudigen, maar de kabel moet wel de juiste afmetingen hebben. De Raspberry Pi-documentatie vermeldt dat de Ethernet-poort van de Raspberry Pi 5 PoE+-compatibel is en dat de Ethernet-poort van de Raspberry Pi 4B/3B+ PoE-compatibel is wanneer de juiste HAT wordt gebruikt. Controleer bij een scherm plus Raspberry Pi het totale stroomverbruik voordat u ervan uitgaat dat één Ethernet-kabel de hele opstelling van stroom kan voorzien.
Opslag: Waarom SD-kaarten niet de juiste standaard zijn voor onbeheerde werking
Een microSD-kaart is handig tijdens de ontwikkelingsfase, maar is zelden de beste opslagoplossing voor onbeheerd gebruik, 24 uur per dag, 7 dagen per week. Browsercaches, logbestanden, databasebewerkingen, pakketupdates, stroomuitval en herhaaldelijk opnieuw opstarten kunnen allemaal de schrijfbelasting verhogen. Wanneer het bestandssysteem beschadigd raakt, kan de kiosk tijdens het opstarten vastlopen, wat onacceptabel is voor een productiescherm.
Voor een industriële Raspberry Pi-kiosk zijn eMMC-varianten op een Compute Module of een SSD/NVMe-configuratie, indien de behuizing dit toelaat, de voorkeursopties. Als microSD-kaarten gebruikt moeten worden, beperk dan het aantal schrijfbewerkingen drastisch. Gebruik logrotatie, tmpfs voor vluchtige bestanden, een alleen-lezen root-bestandssysteem waar mogelijk, remote logging en gecontroleerde updatevensters. De regel is simpel: alles wat constant schrijft, moet kritisch bekeken worden.
Een betrouwbare Raspberry Pi HMI moet ook na stroomuitval kunnen herstellen zonder handmatige toetsenbordtoegang. Dat betekent dat opstartscripts, automatisch opstarten van de kiosk, logica voor het opnieuw proberen van netwerkverbindingen, bestandssysteemcontroles en applicatieherstel getest moeten worden door de stroom herhaaldelijk fysiek uit te schakelen, en niet alleen door op 'herstarten' te klikken vanaf het bureaublad.
Thermisch ontwerp voor Raspberry Pi-schermen die 24/7 gebruikt worden
Het thermische ontwerp bestaat uit twee lagen: de Raspberry Pi-processor en de achtergrondverlichting van het scherm. De Raspberry Pi-documentatie vermeldt dat de Raspberry Pi 3 Model B+ een zachte temperatuurlimiet introduceerde om de gebruiksduur te maximaliseren voordat de harde limiet van 85 °C werd bereikt, en dat het ventilatorgedrag van de Raspberry Pi 5 geleidelijk toeneemt naarmate de temperatuur stijgt. Deze officiële thermische specificaties zijn belangrijk omdat een kioskbehuizing warmte kan vasthouden, zelfs als de ruimte comfortabel aanvoelt.
Het scherm zelf zorgt voor extra warmteontwikkeling. Een industriële touchscreenmonitor met hoge helderheid, vooral met 800 of 1000 nits, produceert meer warmte van de achtergrondverlichting dan een desktopscherm met lage helderheid. De productpagina's van Kadi Display benadrukken hoge helderheid, optische bonding, een breed bedrijfstemperatuurbereik, stabiele achtergrondverlichting en de mogelijkheid om de achtergrondverlichting, behuizing, afdekglas en interface aan te passen. Dit zijn precies de aspecten die bepalend zijn voor een industrieel digitaal signage-project met Raspberry Pi dat 24/7 moet draaien.
Een praktisch ontwerpdoel is om de interne temperatuur van de behuizing te meten na enkele uren bij maximale helderheid, maximale CPU-belasting en de hoogst verwachte omgevingstemperatuur. Test vervolgens opnieuw met gedeeltelijk geblokkeerde stoffilters, indien het systeem gebruikmaakt van ventilatie. Als de kiosk volledig is afgesloten, moet de behuizing als koelplaat fungeren.
Softwarebetrouwbaarheid: Kioskmodus is slechts het begin
De officiële kiosk-handleiding van Raspberry Pi legt uit dat de kioskmodus direct opstart in een webpagina of applicatie op volledig scherm, zonder een normale desktopomgeving, en dat dit de basis vormt voor projecten die specifiek gericht zijn op het weergeven van informatie en interactie. Dat is een goed uitgangspunt, maar het is niet het volledige plan voor betrouwbaarheid.
Een productiekiosk heeft een beheerde applicatieservice nodig, geen venster dat handmatig wordt geopend. Gebruik systemd om de HMI of browser te starten. Herstart deze bij een storing. Schakel onnodige UI-elementen uit. Voorkom dat het scherm zwart wordt. Definieer hoe het apparaat zich gedraagt wanneer het netwerk uitvalt. Cache kritieke inhoud lokaal. Monitor de geheugengroei als Chromium de hele dag draait. Plan gecontroleerde herstarts tijdens perioden met weinig verkeer als bekend is dat de applicatiestack geheugen lekt.
Voor een browsergebaseerde HMI moet de webapplicatie ontworpen zijn voor gebruik in geval van een storing. Als de API niet beschikbaar is, moet een duidelijke offline-status worden weergegeven in plaats van een leeg wit scherm. Als een WebSocket-verbinding mislukt, moet deze op een gecontroleerde manier opnieuw worden geprobeerd. Als het touchscreen niet wordt gedetecteerd, moet dit in de logboeken worden vastgelegd. Operators mogen nooit hoeven te gissen of de machine, het netwerk, de browser of het scherm defect is.
Waakhonden, bewaking op afstand en herstel
Een betrouwbare Raspberry Pi-kiosk moet rekening kunnen houden met storingen en daarvan kunnen herstellen. Dat betekent een hardwarematige watchdog (indien ondersteund), een softwarematige watchdog voor het applicatieproces, netwerkstatuscontroles, lokale statusindicatoren en telemetrie op afstand. De watchdog mag het systeem alleen opnieuw opstarten als de service daadwerkelijk vastloopt, niet bij een korte netwerkvertraging.
De minimale monitoringset moet de volgende gegevens bevatten: CPU-temperatuur, vrije opslagruimte, uptime, status van applicatieprocessen, status van de schermverlichting (indien beschikbaar), netwerkstatus en tijdstip van de laatste contentupdate. Voor industriële HMI's moeten ook fouten in de touchcontroller en gebeurtenissen met betrekking tot het opnieuw verbinden via USB worden geregistreerd. Monitoring op afstand hoeft niet complex te zijn; zelfs een periodieke heartbeat naar een server is voldoende om te controleren of de kiosk actief is.
Maak herstelprocessen inzichtelijk voor kritieke implementaties. Een kleine servicepagina kan de apparaat-ID, softwareversie, IP-adres, laatste update, opslaggebruik, thermische status en schermhelderheidsmodus weergeven. Servicemonteurs moeten de meeste storingen kunnen diagnosticeren zonder de behuizing te openen.
De juiste industriële touchscreenmonitor kiezen
Voor continu gebruik (24/7) moet het scherm worden gekozen als een industrieel onderdeel. Kadi Display's 12,3-inch IPS-touchscreen Op de pagina staat dat HDMI een universele video-uitvoer biedt en dat USB-touch over het algemeen werkt als een standaard HDMI-apparaat op Windows en Linux. Er wordt ook vermeld dat Raspberry Pi en Jetson vaak via HDMI + USB-touch kunnen werken, met mogelijke instellingen voor rotatie of touch-mapping. Dezelfde pagina stelt dat 24/7-werking afhankelijk is van de configuratie en het thermische ontwerp, wat het correcte technische antwoord is en geen vage marketingbelofte.
Voor dashboards of voertuiginterfaces met een groter formaat biedt Kadi Display oplossingen. 15-inch 1920 × 720 1000-nit industrieel LCD-touchscreen Het apparaat is ontworpen voor continu gebruik, 24 uur per dag, 7 dagen per week, en is geschikt voor zelfbedieningsterminals buitenshuis, dashboards in auto's en zware industriële machines. Het ondersteunt standaard industriële interfaces zoals HDMI, VGA en LVDS en onderscheidt zich door een zichtbaarheid van 1000 nits in zonlicht, capacitieve aanraakbediening, een robuuste constructie en een breed bedrijfstemperatuurbereik.
Dit zijn nuttige interne linkdoelen omdat ze op natuurlijke wijze aansluiten bij zoekopdrachten zoals Raspberry Pi industriële displays, betrouwbare Raspberry Pi kiosken, industriële touchscreenmonitoren en Raspberry Pi digitale signage voor de industrie.
24/7 Ontwerpchecklist
Voorbeeldproject: Betrouwbare Raspberry Pi-kiosk voor een fabrieksvloer
Een praktische 24/7 fabriekskiosk zou gebruik kunnen maken van een Raspberry Pi Compute Module, eMMC-opslag, een carrierboard met industriële 12V-naar-5V-regeling, een 10,1-inch of 12,3-inch industrieel touchscreen-monitor, HDMI of MIPI DSI (afhankelijk van de behuizingsbeperkingen), USB of I2C capacitieve touch, Ethernet als primair netwerk, Wi-Fi als back-up, een metalen achterkant en een bewaakte systemd-kioskapplicatie.
De software zou direct opstarten in de HMI, de browsercache beheren, logbestanden naar tmpfs of een externe server schrijven, de browser herstarten bij een storing, een lokale onderhoudspagina weergeven en elke minuut heartbeat-gegevens rapporteren. De behuizing zou worden getest met maximale achtergrondverlichting en maximale CPU-belasting. Het voedingssysteem zou worden getest door herhaalde onderbrekingen van de invoer. De touchscreen-interface zou worden getest met handschoenen, stof, reinigingsvloeistof en tijdens lange perioden van inactiviteit.
Dit is het verschil tussen een Raspberry Pi-project en een industrieel Raspberry Pi-display. De materiaalkosten zijn misschien nog steeds veel lager dan die van een traditionele PLC-paneel-pc, maar de betrouwbaarheid komt voort uit gedisciplineerde engineering, niet alleen uit het Pi-bord zelf.
Conclusie: Een betrouwbare Raspberry Pi-kiosk is een systeem.
Een Raspberry Pi kan absoluut gebruikt worden als de rekenkern van een betrouwbaar industrieel display dat 24/7 operationeel is, maar niet als er nonchalant wordt omgegaan met het scherm, de opslag, de voeding, de software en de behuizing. Het bord is slechts één onderdeel van het systeem. Belangrijker is het kiezen van een industriële touchscreenmonitor, het gebruik van een stabiele voeding, het vermijden van kwetsbare opslagmethoden, het beheersen van de warmte, het bewaken van de kioskapplicatie en het bieden van een herstelprocedure voor het geval er iets misgaat.
Voor budgetvriendelijke HMI-displayprojecten kan de Raspberry Pi de hardwarekosten verlagen en de softwareontwikkeling versnellen in vergelijking met traditionele PLC-panelen of panel-pc's. Voor industriële toepassingen moet het kostenvoordeel echter verstandig worden besteed aan onderdelen die de bedrijfszekerheid garanderen: industriële LCD-schermen, optische verbindingen waar nodig, veilige connectoren, eMMC- of SSD-opslag, thermische tests en bewaking op afstand.
Het beste industriële display voor Raspberry Pi is niet het goedkoopste scherm dat op het goedkoopste moederbord is aangesloten. Het is het systeem dat na duizenden bedrijfsuren nog steeds de juiste informatie, met de juiste helderheid en de juiste aanraakrespons weergeeft. Dat is de standaard waaraan een betrouwbare Raspberry Pi-kiosk moet voldoen voordat deze een plek op de fabrieksvloer verdient.
Bronvermeldingen
Officiële kiosk-handleiding voor Raspberry Pi: De kioskmodus start direct op in een webpagina of applicatie op volledig scherm en wordt gebruikt voor specifieke informatieweergave- en gebruikersinteractieprojecten.
Officiële productpagina van de Raspberry Pi Compute Module 4: Er zijn verschillende CM4-varianten beschikbaar met een uitgebreider temperatuurbereik van -40°C tot +85°C voor extremere binnen- en buitenomstandigheden.
Productbeschrijving Raspberry Pi Compute Module 4: CM4 heeft een 5 V DC-ingang, een 4-lane MIPI DSI-interface, een standaard bedrijfstemperatuur van -20°C tot +85°C, varianten met een verlengde bedrijfstemperatuur van -40°C tot +85°C, een MTBF van 377.000 uur onder gunstige omstandigheden en een productielevensduur tot ten minste januari 2034.
Hardwaredocumentatie voor de Raspberry Pi: Voedingseisen, PoE-informatie, thermisch gedrag en officiële koelingsaanbevelingen voor Raspberry Pi-boards.
Kadi Display Raspberry Pi-displaycategorie: DSI-MIPI, helderheidscategorieën, touchinterfaces, optische bonding en ingebouwde/industriële Raspberry Pi-displaytoepassingen.
Handleiding voor Kadi Display HDMI versus DSI: Vergelijking van HDMI en MIPI DSI voor de integratie van beeldscherm en touchscreen op de Raspberry Pi.
Kadi Display 12,3-inch HDMI industriële touchscreenmonitor: HDMI + USB-touchcompatibiliteit en 24/7-functionaliteit, afhankelijk van de configuratie en het thermische ontwerp.
Kadi Display 15-inch 1920 x 720 1000-nit industrieel LCD-touchscreen: Hoge helderheid, robuuste constructie, standaard interfaces en continue positionering voor 24/7 gebruik.
Vrijwaring
Dit artikel is bedoeld voor technische opleidingen en SEO-contentplanning. Productspecificaties, bedrijfstemperatuur, MTBF, levensduur van de achtergrondverlichting, interfaceondersteuning en 24/7-werking zijn afhankelijk van de exacte Raspberry Pi-variant, schermconfiguratie, behuizing, voeding, softwarestack en werkomgeving. Controleer de uiteindelijke ontwerpveronderstellingen met de relevante productgegevensbladen en leveranciers voordat u producten produceert of inkoopclaims publiceert. Raspberry Pi is een handelsmerk van Raspberry Pi Ltd. Merknamen behoren toe aan hun respectievelijke eigenaren.
Voorgaande
Raspberry Pi-schermen die leesbaar zijn in zonlicht
Volgende
Hoe kies je een fabrikant van beeldschermen voor industriële en medische apparatuurprojecten?
Laat een reactie achter

Laatste Blog & Nieuws
- Why Does an LVDS Display Flicker in Industrial Equipment? Causes and Design Checks
- MIPI DSI Display Not Turning On: Interface, Driver and Initialization Checks for Embedded HMI
- How to Choose Display Interfaces for Rugged Industrial HMI and Panel PC Projects
- How to Connect a Custom TFT Display Module to a ProAV or Control Room System: HDMI, LVDS, eDP, MIPI and USB
- Industrial Touchscreen Displays for Kiosks, POS and Self-Service Terminals: How to Choose the Right TFT Touch Display