Industrial Touchscreens Can Look Great, Too
2026-05-11
11:16
Industrial Touchscreens Can Look Great, Too
A Complete Guide to Display Cover Glass Customisation: Shape, Colour, and Logo
By Kadi Display Technical Team | www.kadidisplay.com | Industrial Display Technology
The Assumption That Industrial Displays Cannot Look Premium
There is an unspoken assumption in a lot of industrial design work: that the human-machine interface is a functional object and visual design is someone else’s problem. The HMI team specifies the processor, the touch technology, the brightness, the ingress protection rating. Then the product design team gets the display and tries to make it fit into a device that is supposed to look like it belongs in a hospital corridor, an airport terminal, or a high-end retail environment. The standard industrial black bezel with chamfered edges and a brand label stuck on with adhesive tape is not a great starting point.
The reality in 2025 is that display cover glass customisation has matured to the point where industrial-grade touchscreens can be manufactured with the same level of visual finish as consumer electronics — without compromising any of the durability, chemical resistance, or IK-rated impact protection that industrial applications require. Custom shape, custom ink colour, printed logos and text, frosted texture zones, metallic effects — all of these are available through standard manufacturing processes at industrial volumes, and the engineering constraints are well understood.
This article covers the full scope of display cover glass customisation for industrial HMI applications: the shape modification processes and their tolerances, the printing techniques available for colour and branding, the specific engineering constraints that differ from consumer glass, and the project workflow that gets you from a concept to production units without expensive late-stage revisions.
Why this matters commercially: End customers in medical, retail, transportation, and hospitality sectors increasingly evaluate the perceived quality of industrial terminals by their visual finish. A custom-branded display cover glass with the customer’s logo, brand colour, and clean edge profile communicates product maturity in a way that a generic black bezel cannot. For OEM suppliers competing on more than price, cover glass customisation is a genuine differentiator.
What Cover Glass Customisation Actually Covers
The Physical Scope
A display cover glass in an industrial touchscreen assembly is typically a flat sheet of chemically tempered glass, 1.1–4.0 mm thick, that sits at the front of the display stack. It may be bonded directly to the touch sensor below (optical bonding) or held in a bezel frame with an air gap. The standard configuration from a panel manufacturer is rectangular, with a flat-ground edge, a black silk-screened border printed on the back surface, and the active display window left clear.
Customisation starts from that baseline and can extend in multiple directions simultaneously. The outline shape can be cut to match an irregular enclosure profile. The corners can be radiused to a specified R-dimension. Holes or cutouts can be added for cameras, microphones, LEDs, physical buttons, or connector access. The border printing can be changed from black to any specified colour, with logo artwork, text, or graphic elements added. The surface finish can be modified from standard flat polished to AG-etched matte, or to a selectively frosted zone that frames the display window in a textured surround. Even the glass thickness can be specified to match a mechanical design requirement.
What Stays the Same
The physical customisation does not affect the underlying glass properties that matter for industrial applications — hardness, chemical tempering depth, IK rating, or operating temperature range — as long as the customisation processes are applied correctly and in the right sequence. Glass cutting and edge finishing are done before tempering in the standard manufacturing flow (cutting tempered glass weakens it); printing is done after tempering. This process order is important to verify with your supplier, because shortcutting it (printing before final cutting, for instance) produces glass with compromised edge strength.
The one significant engineering interaction to watch is ink coverage and touch sensitivity. Capacitive touch sensors read finger proximity through the cover glass electrically. Heavy ink coverage on the back surface of the cover glass — particularly metallic or highly opaque inks — can attenuate the capacitive signal, reducing touch sensitivity in the printed areas. For displays where the touch-active zone extends to the very edge of the glass (edge-to-edge touch), heavy border printing needs to be factored into the touch controller calibration. This is solvable, but it needs to be flagged at the design stage, not discovered during integration testing.
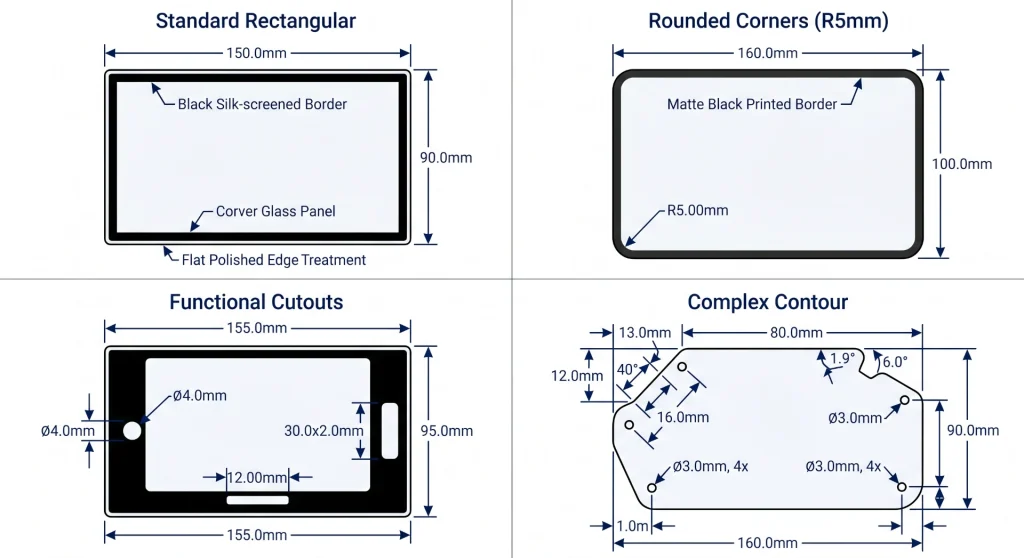
Shape Customisation — What Is Possible and What It Costs
Cutting and Contouring Processes
Glass shape customisation uses CNC machining with diamond tooling as the primary process for most industrial applications. The cutting head follows a programmed path that defines the outline precisely, and the glass is submerged or continuously water-cooled to prevent thermal cracking from the friction heat. Tolerances of ±0.1–0.2 mm on linear dimensions are standard; tighter tolerances (±0.05 mm) are achievable but increase machining time and cost.
Circular and slot cutouts use a core drill or milling head following a programmed path. The minimum practical hole diameter is generally 3 mm for tempered glass, and the edge-to-cutout clearance needs to be at least three times the glass thickness to avoid propagating cracks from the cutout to the glass edge under stress. This constraint is frequently overlooked in early-stage mechanical design — a cutout that is mechanically elegant in a CAD model can require a complete chassis redesign once the glass engineer flags the stress clearance requirement.
Edge Finishing Options
The edge of a glass panel is a significant stress concentration point and a significant aesthetic detail simultaneously. The standard flat-ground edge (also called C0 or Arrised) is the minimum acceptable finish for industrial applications — it removes the sharp cut edge left by initial cutting and reduces the likelihood of handling chips that propagate into cracks. For applications where the glass edge is visible to the user, or where the edge is frequently contacted during cleaning, a bevelled edge (C0.3–C0.5) or pencil-polished edge (full radius) provides a safer and more refined finish.
From a mechanical durability standpoint, a polished edge performs measurably better than a ground edge in drop and impact testing, because polishing removes the micro-crack population left by grinding. In IK rating tests, the failure mode is often edge-initiated fracture propagating across the panel — a polished edge reduces this failure probability, and for applications targeting IK10, specifying polished edges rather than flat-ground is worth the additional cost.
Cover Glass Shape Customisation Options
Design constraint to flag early: Glass cannot be cut or drilled after chemical tempering without risk of catastrophic failure. Shaping must be completed on the raw glass before tempering. This means that any design changes to glass outline or cutout positions after tempering starts require a completely new substrate — there is no post-tempering rework. Freeze the mechanical design before committing to a glass production run.
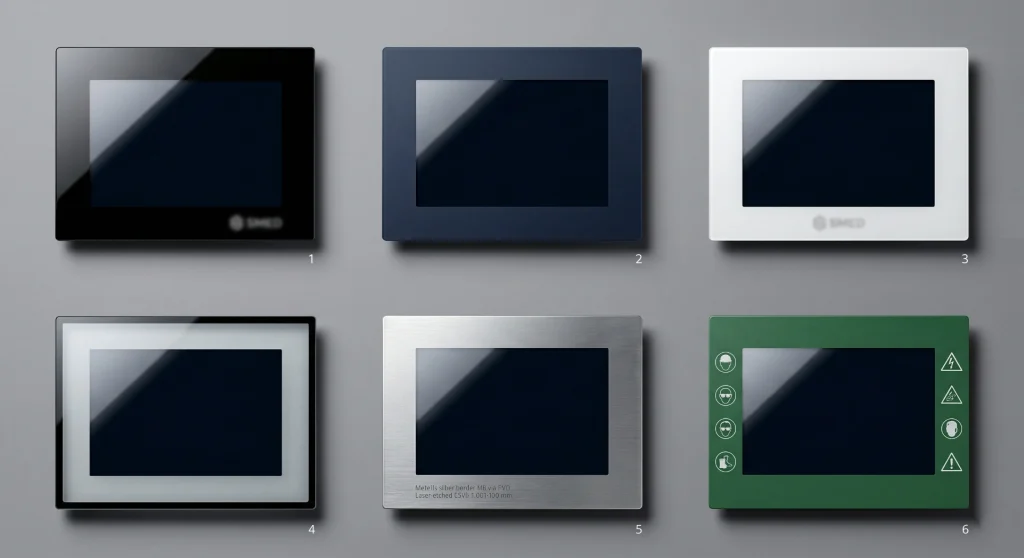
Colour Customisation — From Matte Black to Brand Pantone
Why the Standard Black Border Is Not Your Only Option
The black ink border printed on the back surface of most cover glass panels is there for a functional reason: it hides the bezel, adhesive, touch sensor border, and LCD module edges from the viewer’s eye. Black is optically neutral and easy to achieve with inexpensive UV-cured silk-screen ink. But black is not the only option, and for brands that operate in specific colour identities — corporate blue, RAL-specified industrial grey, white for medical devices — a custom ink colour is both achievable and meaningful.
The practical constraint is that ink colour on glass is not the same as ink colour on paper or screen. Glass is transparent and has its own optical character; the black undercoat that most border inks require to achieve opacity affects the final colour appearance. Ink printed on the back surface of the glass is seen through the glass from the front — the glass acts as a filter, slightly shifting the apparent colour. This is manageable with proper colour profiling (converting the target Pantone or RAL value into the print-side equivalent that will read correctly through the glass), but it requires a physical colour proof on the actual glass substrate before mass production approval. Never approve a colour from a screen printout.
Matte vs. Gloss and Selective Finishes
Beyond solid colour fills, cover glass printing can create selective matte / gloss combinations that give the finished panel a layered visual quality. A typical approach is a gloss-black inner border surrounding the active display area, with a matte-black or matte-colour outer border around the product edge — the contrast between the two finishes creates a visual depth that communicates product quality without adding cost beyond the ink specification.
For premium applications, frosted zones created by selective AG etching before printing add a tactile and visual texture that is distinctive. The frosted area scatters light differently from a polished surface, creating a soft-focus appearance that works particularly well as a frame around the display window or as a button-label zone on a fixed-function control panel. The manufacturing sequence matters: etch before printing, then harden, because frosted surfaces are more porous than polished glass and can absorb ink unevenly if the sequence is reversed.
Logo and Branding Printing — Processes, Durability, and Design Rules
Silk-Screen vs. UV Inkjet — Choosing the Right Process
The two dominant printing processes for industrial cover glass branding are silk-screen printing and UV inkjet printing. They are not interchangeable, and choosing between them depends on the artwork complexity, the durability requirement, and the production volume.
Silk-screen printing uses a mesh screen and a squeegee to push ink through a stencil onto the glass surface in a single pass per colour. It is the process of choice for high-opacity solid fills (border colours, solid logo blocks) and for production volumes above a few hundred units, where the fixed tooling cost amortises quickly. Minimum line width is approximately 50 μm with a skilled operator and good screen quality. Gradient printing is difficult and usually approximated by a halftone dot pattern. The ink layer is thick (typically 10–30 μm), which means good coverage opacity but also a step edge that can be felt tactilely and may affect touch sensor performance in border-adjacent areas.
UV inkjet printing deposits tiny drops of UV-cured ink directly onto the glass surface without a physical screen, guided by a digital file. This allows photographic-quality artwork at 720–2,400 dpi, multi-colour gradients, small fine text, and variable data (serial numbers, QR codes that change per unit). The ink layer is thinner (3–10 μm), which reduces the tactile edge effect and the touch sensor attenuation. For low volumes, UV inkjet avoids screen tooling costs entirely. The trade-off is per-unit cost at high volume and slightly lower ink opacity at the same coverage.
Laser Etching for Permanent Marks
For compliance markings, serial numbers, and QR codes that must survive the full service life of the device without fading, laser etching is the most durable option. The laser modifies the glass surface itself — either ablating a coating layer or creating a localised change in glass structure — producing a mark that cannot be removed without physically abrading the glass. This is used for CE marking, UL certification marks, regulatory text, and any branding element that needs to be verifiably permanent for product traceability.
The visual result of laser etching on clear glass is a frosted white appearance at the etch point. On a printed black border, laser etching through the ink reveals the glass beneath, creating a precise white-on-black logo or text. On metallic PVD coating, laser etching reveals the glass colour beneath the metal, creating a bright-on-metallic effect. The combination of PVD base coat with laser-etched logo is used in premium medical, aviation, and defence applications where the finish quality signals product category.
Critical Design Rules for Logo Artwork
Several logo design constraints are specific to glass printing and differ from general print design. Minimum text height for silk-screen printing is typically 1.5 mm for filled text, 2.0 mm for outlined text — below this, the letter forms begin to fill or collapse at the print stage. Minimum feature width for isolated lines is 0.1 mm for UV inkjet, 0.2 mm for silk-screen. Reversed-out (white on black, clear on black) text and logos have slightly relaxed minimum sizes compared to positive print, because the inked area is continuous and tolerances in the clear areas are less critical.
Colour specification should always include Pantone Matching System (PMS) codes or RAL Classic codes for physical colour references, not RGB or hex values. RGB values describe light emission from a screen; Pantone and RAL describe physical ink reflectance. The conversion between them is non-trivial and varies with the glass surface, the ink formulation, and the viewing conditions. Request a physical Pantone swatch or RAL chip comparison against the proof glass before mass production sign-off.
Cover Glass Printing and Branding Process Comparison
Custom cover glass with logo and colour printing: Customised Display Solutions — Kadi Display — OEM and ODM cover glass customisation including shape, ink colour, logo silk-screen printing, UV inkjet, and laser etching. Supports full display module integration with custom front glass, interface, and optical bonding.
Durability of Customisation — What Lasts and What Fades
Ink Durability in Industrial Environments
The durability of printed elements on industrial cover glass depends primarily on ink chemistry and print position. Ink printed on the back surface of the cover glass (the surface that faces the touch sensor or display panel) is protected from the external environment by the glass itself — it cannot be abraded by cleaning, scratched by tools, or degraded by UV radiation from outside. This is the standard configuration for border and logo printing, and it provides excellent long-term durability: back-printed UV-cured inks on chemically tempered glass will typically outlast the display panel and the device they are mounted in under normal conditions.
Front-surface printing is occasionally requested for special effects — raised tactile buttons, raised logo textures, glow-in-dark elements — but it is exposed to the environment and requires a protective clear hardcoat over the ink to achieve acceptable service life. Without a hardcoat, front-surface industrial ink typically degrades within 12–24 months under cleaning and abrasion in industrial environments. With a properly applied hardcoat (7H pencil hardness minimum), front-surface print durability can extend to 5+ years, but UV resistance must be specifically qualified for outdoor installations.
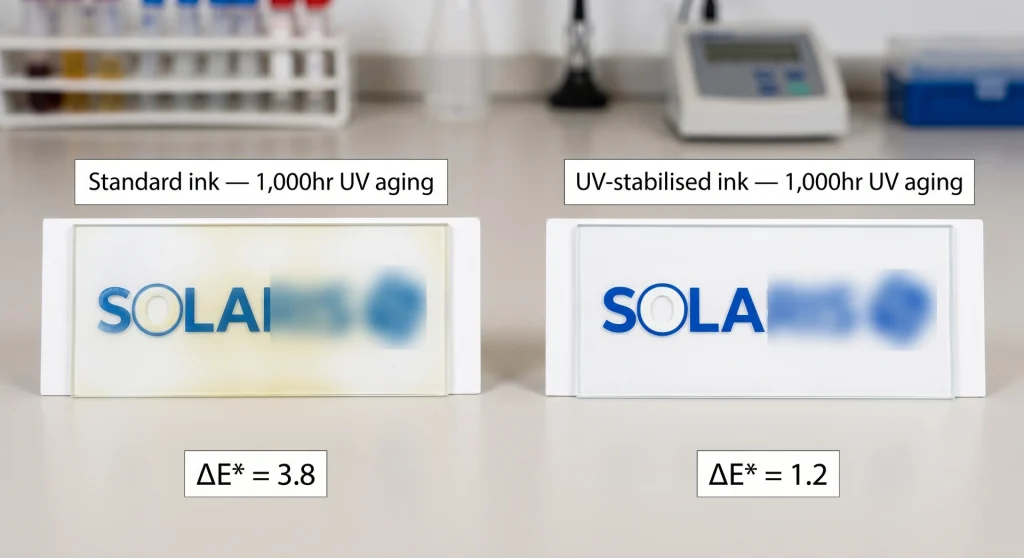
Colour Stability Over Time
Colour shift under UV exposure is the most common long-term degradation mode for printed cover glass in outdoor applications. Standard silk-screen inks — even UV-cured formulations — can show measurable colour shift (delta E > 3) after 1,000 hours of accelerated UV aging equivalent to 2–3 years of outdoor exposure. For outdoor installations, specify UV-stabilised ink formulations with delta E ≤ 2.0 after 1,000-hour UV aging to the relevant standard.
Laser-etched marks do not fade — the modification is in the glass structure itself. For compliance markings and serial numbers that must remain legible for the full product lifecycle, laser etching is the specification that eliminates the ink durability question entirely.
The Customisation Workflow — From Design File to Production
What to Prepare Before Contacting a Supplier
The fastest way to slow down a custom cover glass project is to contact a supplier without design documentation ready. Suppliers can work from concept drawings, but every iteration of the shape and artwork at the supplier’s end adds time and the risk of interpretation errors. The documents that make a custom glass project move quickly are:
- Glass outline drawing in DXF or DWG format, 1:1 scale, with all dimensions, tolerances, edge finish specification, thickness, and cutout positions explicitly dimensioned.
- Artwork in vector format (AI, EPS, or PDF), 1:1 scale, with print colour specified in Pantone or RAL code. Text elements converted to outlines, not live text.
- Print position reference drawing showing where the artwork falls relative to the glass outline, with the active display window area clearly indicated.
- Surface treatment specification: which surface gets AG etching, where hardcoat is applied, whether optical bonding is required, and touch sensor compatibility requirements.
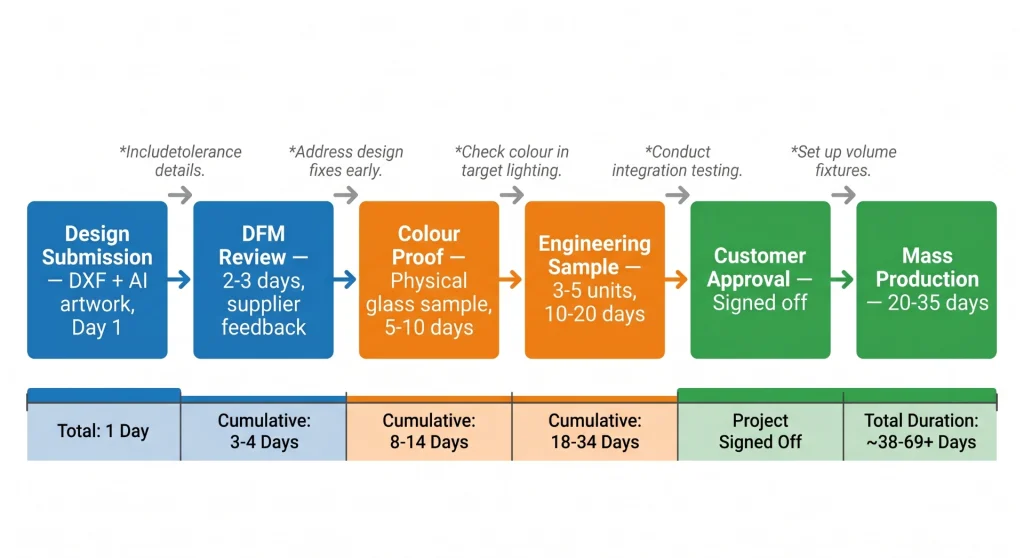
Customisation Production Workflow
Cover Glass Customisation Project Workflow
The workflow table makes one thing clear: the physical colour proof stage is not optional. Every experienced product developer who has tried to skip the colour proof and approve from a screen rendering has at some point received mass production units in the wrong colour. The human visual system is extremely sensitive to colour deviation — delta E differences as small as 2.0 are visible to most people in direct comparison — and the difference between a proof on paper and ink on glass through a viewing angle of 50 mm of chemically tempered glass can easily exceed that threshold.
Start a custom cover glass project: Kadi Display — Custom Display Solutions — Cover glass customisation support including shape drawing review, colour profiling, silk-screen and UV inkjet printing, laser etching, optical bonding, and full display module integration. Low MOQ for prototype runs. Engineering support from the Shenzhen facility.
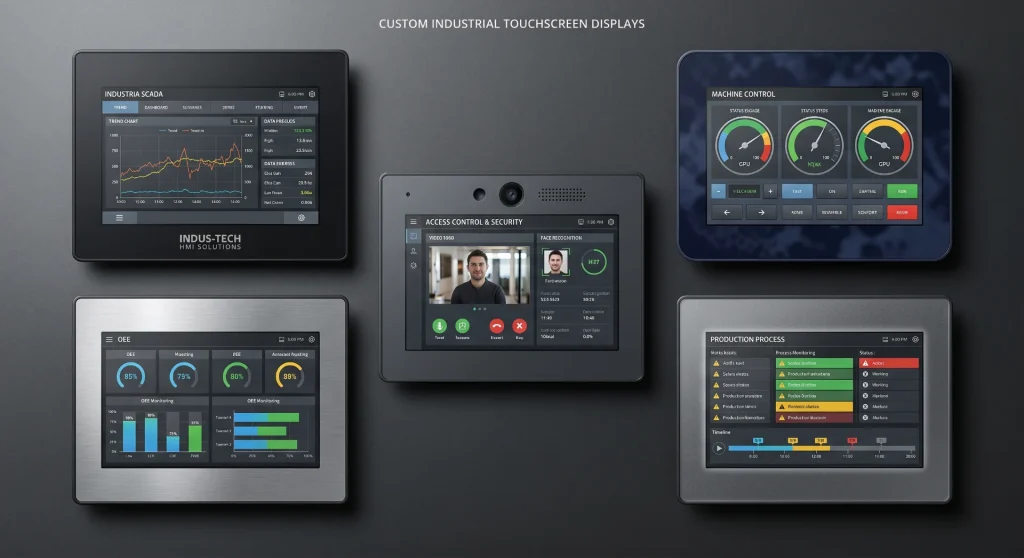
Industry Applications — Where Custom Cover Glass Makes a Measurable Difference
Medical Terminals and Patient-Facing Devices
Medical device manufacturers face a specific combination of requirements: white or light-coloured surfaces (the standard colour of medical equipment), IP65 cleanability, PCAP touch through the cover glass, and regulatory markings (CE, IEC 60601, UL) that must be permanently applied. Custom white cover glass with back-printed border, laser-etched compliance marks, and AF coating is the solution that satisfies all of these simultaneously. The AF coating on the touch surface reduces the visible contamination from repeated gloved-hand contact that makes untreated white surfaces look unhygienic within hours of deployment.
Retail and Hospitality POS Terminals
Point-of-sale terminals and self-service kiosks in retail and hospitality environments are the industrial devices most consistently evaluated by non-technical end users for visual quality. The display is the face of the device. Custom cover glass with brand-matched colour, flush edge mounting in the enclosure, and a consistent gloss-level finish contributes directly to brand perception in a way that no specification number can capture. Several major retail technology brands have moved custom cover glass to their standard specification for terminal displays, treating it as a branding investment rather than a cost item.
Transportation and Wayfinding Displays
Transit operators and airport authorities specifying passenger information terminals increasingly request custom cover glass as part of their design language. The practical driver is vandalism resistance (IK10 glass) combined with a visual language that integrates with the station or vehicle design — specific RAL colours matched to the operator’s brand palette, minimal bezel, custom shape to fit architectural recesses. These are projects where the visual outcome and the engineering outcome need to be optimised simultaneously, and that requires a display supplier capable of managing both.
See also: Industrial Display Monitors — Kadi Display — Industrial monitor range with optional custom cover glass, IP65 front sealing, high-brightness panels, and custom bezel finishing. Suitable for medical, retail, transportation, and public-facing kiosk applications.
Cost Structure and MOQ — What to Expect
Where the Cost Comes From
Custom cover glass costs more than standard off-the-shelf panels, but the premium is smaller than most people outside the supply chain expect. The cost components are: glass substrate (determined by material type and thickness), CNC shape machining (amortised tooling, per-unit machining time), surface treatments (AG etching, AR coating, hardcoat — each adds $1–8 per unit at moderate volume), printing tooling (silk-screen screens are $50–200 per colour; UV inkjet has no tooling cost), and printing itself ($0.5–3 per unit depending on coverage and process).
For a typical 7-inch custom cover glass — chemically tempered, rounded corners, custom shape with two cutouts, black border with white logo silk-screened, AG surface, hardcoat — the incremental cost over a standard equivalent is roughly $5–15 per unit at volumes of 500–2,000 units. At 5,000+ units, this compresses to $3–8. These are market-indicative figures, not quoted prices — exact costs depend on the specific glass supplier, the shape complexity, and the printing process.
Minimum Order Quantities
Most cover glass customisation suppliers work with prototype quantities of 3–10 units for engineering samples and colour proofs. Mass production minimum order quantities vary: shape customisation alone typically has no MOQ (the CNC tooling is programmable and can run small batches), while printing setup cost creates a practical minimum of 50–200 units per print run for silk-screen, and no practical minimum for UV inkjet. Some suppliers, including those with flexible OEM/ODM capability, accept orders from 100 units for custom printed glass with mixed quantities across colour variants.
Summary — The Case for Treating Cover Glass as a Design Element
The industry’s default position — standard black bezel, standard edge, standard shape — made sense when customisation was expensive and lead times were long. Neither of those constraints is as significant in 2025 as it was five years ago. CNC shape machining is programmable and fast. Silk-screen and UV inkjet printing on glass is a mature process with well-understood colour management. The workflow from design file to mass production is documented and repeatable.
The argument for custom cover glass in industrial display applications is not primarily aesthetic. It is a product engineering argument: a cover glass that fits the enclosure without gaps, matches the product’s brand language, carries permanent compliance markings, and communicates the product’s quality tier through its surface finish is a better-integrated component than a generic equivalent. The time to have that conversation with a display supplier is at the beginning of the mechanical design phase — before the glass outline is frozen, before the enclosure tooling is committed, and before the brand identity has been squeezed to fit whatever standard panel size was in stock.
Custom cover glass enquiries — shape, colour, logo printing, surface treatment, optical bonding, and full display module integration — can be directed to Kadi Display at Sales@sz-kadi.com. Prototype samples from 3 units. OEM and ODM project support available from the Shenzhen manufacturing facility. Visit kadidisplay.com for the full product and customisation catalogue.
Disclaimer: Manufacturing process capabilities, tolerances, cost figures, and lead times cited in this article are representative industry ranges for informational purposes only. Actual specifications, pricing, and timelines vary by supplier, design complexity, and production volume. Pantone® and RAL® are registered trademarks of their respective owners. This article does not constitute a quotation or commitment from any named supplier. Always obtain a written specification and sample approval before committing to production.
PREVIOUS
From Indoors to Extreme Environments:A Spectrum-Based Decision Framework for Industrial Display Brightness
NEXT
How to Choose a Durable Cover Glass for Outdoor Industrial Displays
Leave A Comment

Latest Blog & News
- Air Bonding vs Optical Bonding: How to Choose for Industrial Touchscreens
- How LED Backlight Lifetime Affects Industrial TFT LCD Display Reliability
- IPS vs TN vs VA Displays for Industrial and Medical Equipment: How to Choose the Right LCD Panel
- What Is a Wide Temperature LCD Display and When Do Industrial Devices Need One?
- How to Choose an Industrial TFT LCD Display Module: Size, Brightness, Interface, Touch & Customization Guide